Protobuf 主要是以数据编码小为著名,主要是用于数据交互和数据存储等,降低带宽、磁盘、移动端网络环境较差减少报文大小等场景,关于序列化速度主要是取决于你用的sdk,所以本文不会关心序列化速度!本文将以proto3语法进行介绍!并且也介绍了如何使用pb规范的定义接口,以及对比了pb2/pb3差别!如果你还对Thrift感兴趣,可以看我这边文章: Thrift协议讲解 !
1. 协议讲解 pb3 与 pb2差别: pb3 对于基本类型已经约定了默认值,会把 0/""/false/枚举为0的值 在序列化的时候不进行编码,也就是无法区分这个值是否设置了! pb3 后期支持了 optional,但是需要在编译的时候指定--experimental_allow_proto3_optional! pb3 不支持 required 关键字,不推荐业务定义required! pb3 不支持默认值设置,pb3中默认值都是约定好的,以及不支持group message! pb3 的枚举类型的第一个字段必须为 0! pb3 和 pb2 是可以混合使用的!pb3和pb2基本上压缩率和性能上无差别!labels pb2 pb3 备注 required 支持 不支持 optional 支持 支持 singular (类似于thrift default) 不支持 支持 repeated 支持 支持 oneof 支持 支持 map 支持 支持 extend 支持 不支持
选择上来说就是看你是否需要 null和默认值!如果需要那就pb2,不行就pb3!
pb3基本上语法如下,具体可以看官方文档: https://developers.google.com/protocol-buffers/docs/proto3 , 例如下面的test.proto 文件 1 2 3 4 5 6 7 8 9 10 11 12 13 14 15 16 17 18 19 20 21 22 23 syntax = "proto3" ; message TestData enum EnumType UnknownType = 0 ; Test1Type = 1 ; Test2Type = 2 ; } message TestObj int64 t_int64 = 1 ; } string t_string = 1 ; int64 t_int64 = 2 ; bool t_bool = 3 ; fixed64 t_fix64 = 4 ; repeated int64 t_list_i64 = 5 ; map<int64 , string > t_map = 6 ; EnumType t_enum = 7 ; TestObj t_obj = 8 ; repeated TestObj t_list_obj = 9 ; map<string , TestData> t_map_obj = 10 ; repeated string t_list_string = 11 ; }
如何编译了? 如果是Go的话可以下面这种方式编译!记住提前下载好 protoc-gen-go 和 protoc-gen-go-grpc , 源码地址: protobuf-go 1 2 3 4 5 6 7 8 9 10 11 12 13 14 15 16 # install protoc & protoc-gen-go & protoc-gen-go-grpc wget https://github.com/protocolbuffers/protobuf/releases/download/v3.17.3/protoc-3.17.3-osx-x86_64.zip go get -v google.golang.org/protobuf/cmd/protoc-gen-go go get -v google.golang.org/grpc/cmd/protoc-gen-go-grpc # 编译上面的'test.proto' 文件 protoc \ --experimental_allow_proto3_optional \ --proto_path=. \ --plugin=protoc-gen-go=${HOME}/go/bin/protoc-gen-go \ --go_opt=Mtest.proto=github.com/anthony-dong/go-tool/internal/example/protobuf/test \ --go_out=${HOME}/go/src \ --plugin=protoc-gen-go-grpc=${HOME}/go/bin/protoc-gen-go-grpc \ --go-grpc_opt=Mtest.proto=github.com/anthony-dong/go-tool/internal/example/protobuf/test \ --go-grpc_out=${HOME}/go/src \ test.proto
pb 序列化核心用到的思想就是varint + zigzap, 具体可以看官方文章: https://developers.google.com/protocol-buffers/docs/encoding 本文的目标是可以做到简单的序列化 message 和 反序列化message! 目前Go主要有两个PB库,一个是V1版本的: https://github.com/golang/protobuf ,一个是V2版本的: https://github.com/protocolbuffers/protobuf-go , 都属于官方实现! 2. 编码+解码 关于消息各个类型的编码逻辑: https://github.com/protocolbuffers/protobuf-go/tree/master/internal/impl
核心思想:
varint ,根据数字的大小进行动态编码,可以减少字节数的占用,采用 msb(the Most Significant Bit) 最高有效位,整个过程可以理解为大端->小端转换,具体可以看后面讲述!zigzag 由于负数的最高高位永远是1,导致-1占用8字节,比较浪费,所以zigzag做了一个映射,负数可以映射成正数,正数还是正数,具体可以看后面讲述! 1. 简单例子(学习目标) 下面是一个测试用例,可以看到一个是通过PB自带的库编码,一个是我们自己实现的编码,我们这篇文章目标是可以自己实现编码!
1 2 3 4 5 6 7 8 9 10 11 12 13 14 15 16 17 18 19 20 21 22 23 24 25 26 27 28 29 30 31 32 33 34 35 36 37 38 39 func Test_Marshal_Data (t *testing.T) var request = test.TestData{ TString: "hello" , TInt64: 520 , TObj: &test.TestData_TestObj{ TInt64: 520 , }, } marshal, err := proto.Marshal(&request) if err != nil { t.Fatal(err) } t.Log(hex.Dump(marshal)) } func TestMarshal_Data_Custom_Test (t *testing.T) buffer := bytes.NewBuffer(make ([]byte , 0 , 1024 )) binary.Write(buffer, binary.BigEndian, uint8 (0x0a )) binary.Write(buffer, binary.BigEndian, uint8 (0x05 )) binary.Write(buffer, binary.BigEndian, []byte ("hello" )) binary.Write(buffer, binary.BigEndian, uint8 (0x10 )) binary.Write(buffer, binary.BigEndian, uint16 (0x8804 )) binary.Write(buffer, binary.BigEndian, uint8 (0x42 )) binary.Write(buffer, binary.BigEndian, uint8 (0x03 )) binary.Write(buffer, binary.BigEndian, uint8 (0x08 )) binary.Write(buffer, binary.BigEndian, uint16 (0x8804 )) t.Log(hex.Dump(buffer.Bytes())) }
2. Message 编码介绍 1. 介绍 消息是由 field_id 和 field_value组成,但是pb支持的类型比较多,考虑到编码的时候很多类型其实有相似的逻辑,因此pb对于类型进行了二次归类,叫做wire type,也就是 field_id和wire_type组合成一个字段用varint进行编码!
1 2 3 4 field id, wire_type used varint encode +--------+...+--------+--------+--------+...+--------+ | field id |dddddttt| field value | +--------+...+--------+--------+--------+...+--------+
field id+ dddddttt 一共是 1-4个字节,用的是 varint 编码!具体Go的代码实现如下1 2 3 4 5 6 7 8 9 10 11 12 13 14 15 16 17 18 19 20 21 22 23 24 25 26 27 func (b *Buffer) EncodeTagAndWireType (fieldId int32 , wireType int8 ) error v := uint64 ((int64 (fieldId) << 3 ) | int64 (wireType)) return b.EncodeVarint(v) } func (cb *Buffer) DecodeTagAndWireType () (tag int32 , wireType int8 , err error) var v uint64 v, err = cb.DecodeVarint() if err != nil { return } wireType = int8 (v & 7 ) v = v >> 3 if v > math.MaxInt32 { err = fmt.Errorf("tag number out of range: %d" , v) return } tag = int32 (v) return }
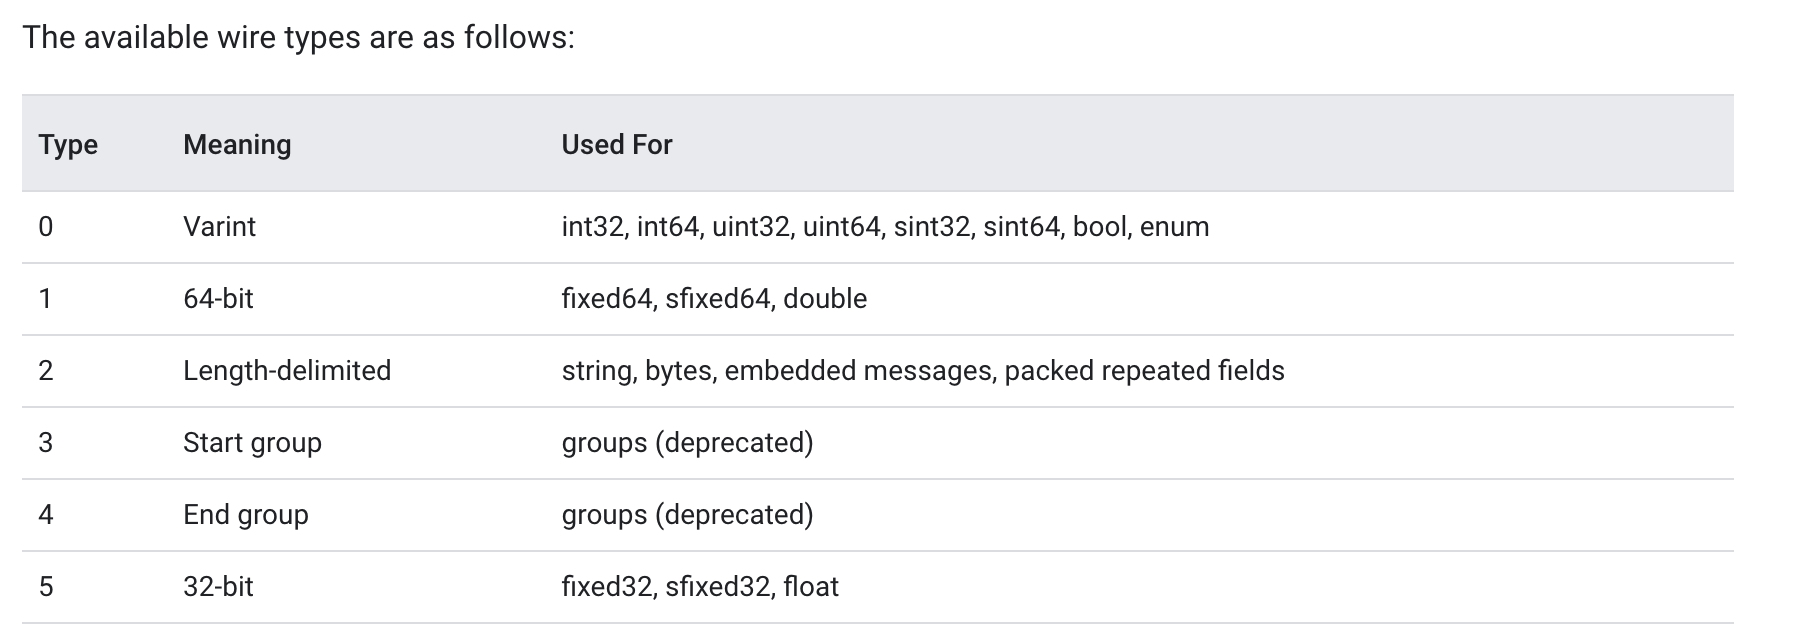
ttt 为3bit表示wire_type,也就是最多表示1<<3 -17种类型,包含000 ,也就是8种类型,具体可以看官方文档: wire types 介绍 !
1 2 3 4 5 6 7 8 9 10 11 12 13 14 15 16 17 18 19 20 21 22 23 24 25 26 27 28 29 30 31 32 33 34 35 36 37 38 39 40 41 42 43 44 45 46 47 48 49 50 51 52 const ( WireVarint = 0 WireFixed32 = 5 WireFixed64 = 1 WireBytes = 2 WireStartGroup = 3 WireEndGroup = 4 ) func MustWireType (t descriptor.FieldDescriptorProto_Type) int8 wireType, err := GetWireType(t) if err != nil { panic (err) } return wireType } func GetWireType (t descriptor.FieldDescriptorProto_Type) (int8 , error) switch t { case descriptor.FieldDescriptorProto_TYPE_ENUM, descriptor.FieldDescriptorProto_TYPE_BOOL, descriptor.FieldDescriptorProto_TYPE_INT32, descriptor.FieldDescriptorProto_TYPE_SINT32, descriptor.FieldDescriptorProto_TYPE_UINT32, descriptor.FieldDescriptorProto_TYPE_INT64, descriptor.FieldDescriptorProto_TYPE_SINT64, descriptor.FieldDescriptorProto_TYPE_UINT64: return proto.WireVarint, nil case descriptor.FieldDescriptorProto_TYPE_FIXED32, descriptor.FieldDescriptorProto_TYPE_SFIXED32, descriptor.FieldDescriptorProto_TYPE_FLOAT: return proto.WireFixed32, nil case descriptor.FieldDescriptorProto_TYPE_FIXED64, descriptor.FieldDescriptorProto_TYPE_SFIXED64, descriptor.FieldDescriptorProto_TYPE_DOUBLE: return proto.WireFixed64, nil case descriptor.FieldDescriptorProto_TYPE_BYTES, descriptor.FieldDescriptorProto_TYPE_STRING, descriptor.FieldDescriptorProto_TYPE_MESSAGE: return proto.WireBytes, nil case descriptor.FieldDescriptorProto_TYPE_GROUP: return proto.WireStartGroup, nil default : return 0 , fmt.Errorf("not support pb type: %d" , t) } }
field value 就是字段内容了,下面会详细介绍每一种对应的!1 2 3 4 5 WireVarint 写的时候采用varint 编码,可变1-10字节 WireFixed32 写的时候会进行小端转换,固定4字节 WireFixed64 写的时候会进行小端转换,固定8字节 WireBytes 写的时候正常写出字节流即可! WireStartGroup / WireEndGroup 不进行介绍了!
2. 总结 这里谈个小技巧,其实看协议编码这种源码的时候,很多位运算,其实一般来说 |表示set bit操作, &表示get bit操作! 这里再补充下为啥最大字段是2^29-1,是因为nuber最大是ui32编码,然后有3bit用作msb,就剩余29位了,所以就是2^29-1了! 这就是为什么pb中1-15字段可以使用一个字节存储,是因为 var int只有7字段存储数据,但是3bit存储wire_type,所以剩余的4bit存储字段ID,也就是1<<4 -1 = 15 个字段了! 3. varint 编码介绍 wiki介绍 https://en.wikipedia.org/wiki/Variable-length_quantity ,整体概述一下就是对于无符号整数来说,很多时候都是浪费字节,比如uint64 占用 8字节,值为1是占用8字节,值为1<<64 - 1也是一样,那么varint就是解决这个问题了,可以用1-10个字节进行表示!核心思想就是使用低位的7bit表示数据,高位1bit表示msb(The Most Significant Bit, 最高有效位),最小1个字节,最大10个字节表示 int64 !
pb中类型为如下类型都会采用varint 编码 , 枚举等同于int32!
1 varint := int32 | int64 | uint32 | uint64 | bool | enum, encoded as varints
1. 例子1 比如: data=15 -> 0000 1111,
编码逻辑:
varint 表示为 0000 1111,是因为他能够用7字节表示!所以不需要设置 msb!
解析逻辑:
我们拿到 0000 1111 取出msb 发现1 ,这里拿到msb有多种方式,可以比较大小,也能通过位运算进行取,比如 0000 1111 & 1<<7 == 0 就可以说明没有设置msb,然后取出低7位即是真实数据,这里由于8位也是0其实可以忽略这个操作!
2. 例子2 比如 data=520 -> 0000 0010 0000 1000 (大端表示法,低位在高地址)
编码逻辑:
首先确定520是7个bit放不下,所以先取出 前7个字节( data & (1<<7) - 1) = 000 1000,然后设置msb 1000 1000, 这个是第一轮;
第二轮剩余字节 0000 0010 0= 4 , 发现4可以用7个字节放下,所以是 0000 0100
所以最终结果是 1000 1000 0000 0100 ,也就是 [136,4],这个过程可以理解为是大端 -> 小端的一个过程!
解析逻辑:
首先varint 其实输出的是一个小端表示法,因此我们需要从低位开始!
首先是取出第一个字节1000 1000 ,发现msb,然后得到结果是 000 1000 = 8
然后是取出第二个字节0000 0100,发现不是msb,然后得到结果 000 0100,我们需要将它放到 000 1000后面去!怎么做了,其实跟简单 000 0100 << 7 | 000 1000 即可得到结果是 000 0100 000 1000 = 0000 0010 0000 1000 。 这个逻辑可以理解为是小端->大端的一个过程
3. 代码实现 1 2 3 4 5 6 7 8 9 10 11 12 13 14 15 16 17 18 19 20 21 22 23 24 25 26 27 28 29 30 31 32 33 34 35 36 37 func (p *pbCodec) EncodeVarInt (data int64 ) error for data > (1 <<7 - 1 ) { p.buffer = append (p.buffer, byte (data&(1 <<7 -1 )|(1 <<7 ))) data >>= 7 } p.buffer = append (p.buffer, byte (data)) return nil } func (p *pbCodec) DecodeVarInt () (int64 , error) var ( x int64 n = 0 ) defer func () p.buffer = p.buffer[n:] }() for shift := uint (0 ); shift < 64 ; shift += 7 { if n >= len (p.buffer) { return 0 , fmt.Errorf("not enough buffer" ) } b := int64 (p.buffer[n]) n++ x |= (b & 0x7F ) << shift if (b & 0x80 ) == 0 { return x, nil } } return 0 , fmt.Errorf("proto integer overflow" ) }
4. 非 varint 编码类型 1. fixed 64/32 类型 (小端) 其实就是用小端进行传输!例如fixed64 = 520 小端编码后如下,为此为了和varint进行区分,所以定了两个wire type=WireFixed32|WireFixed64
1 2 3 4 # fix64 520 占用 8 字节 00 00 00 00 00 00 02 08 # 编码后 08 02 00 00 00 00 00 00
例如Go代码的具体实现, 这里以 64位为例子
1 2 3 4 5 6 7 import "encoding/binary" binary.Write(bf, binary.LittleEndian, uint64 (520 )) var data uint64 binary.Read(bf, binary.LittleEndian, &data)
2. double / float 类型 同上面的fixed 64/32 ,double需要转换为 fixed64 , float需要转换为fixed32, 具体 float -> uint Go的转换代码实现:
1 2 3 4 import "math" math.Float32bits(v) math.Float64bits(v)
3. string / bytes / message / packed 类型 string 和 bytes 都是变长,所以需要先写长度(var int)编码,再写payload,如果是string的话需要utf-8编码!
message 类型也是采用的如下编码,所以在PB里无法通过二进制报文直接解析 !
1 2 3 4 delimited := size (message | string | bytes | packed), size encoded as varint message := valid protobuf sub-message string := valid UTF-8 string (often simply ASCII); max 2 GB of bytesbytes := any sequence of 8 -bit bytes; max 2 GB
1 2 3 4 5 6 delimited := size (message | string | bytes | packed), size encoded as varint # size bytes +--------+...+--------+--------+...+--------+ | byte length | bytes | +--------+...+--------+--------+...+--------+
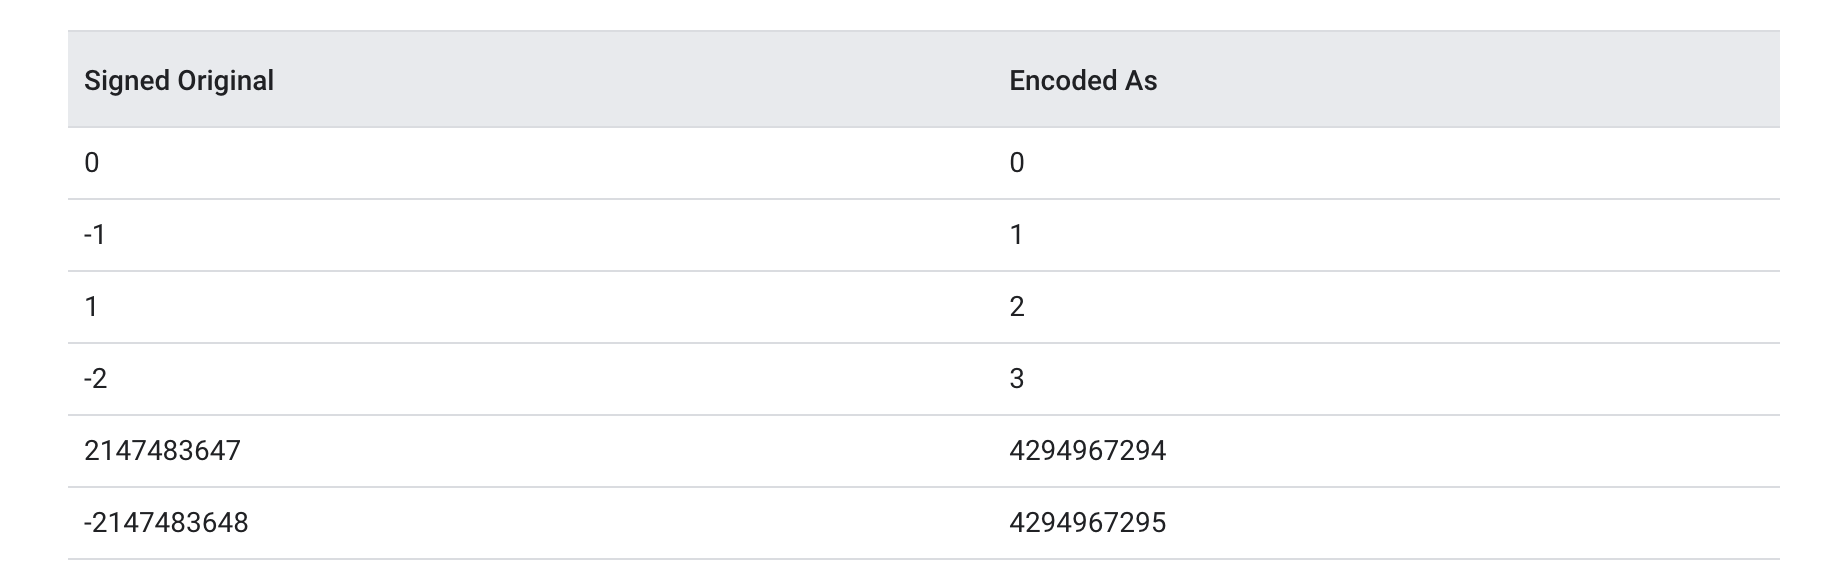
5. zigzag 编码 ( sint32 / sint64) 前面讲的varint并不是万能的,因为数据往存在负数,而负数二进制最高位都是1,所以导致varint编码后数据都很大,所以需要zigzag编码,它可以帮负数转换成正数,正数转换成正数!而且基于位运算效率很高 ,所以pb提出了sint32、sint64编码,解决这个问题,核心其实就是使用了 zigzag 编码!
例如: int64 类型,值为 -1, varint 编码是:ff ff ff ff ff ff ff ff ff 01 满满的占用了10个字节! 但是假如是 sint64 类型,值为 -1, zigzag 编码后值为01,然后varint编码后是 01, 此时就节省了9个字节!
zigzag 编码其实很简单就是类似于做了层映射!用无符号的一半表示正数一半表示负数!
具体算法用Go写大改如下:
1 2 3 4 5 6 7 8 9 10 11 12 13 14 15 16 17 18 19 20 21 22 23 24 25 func EncodeZigZag64 (v int64 ) uint64 return (uint64 (v) << 1 ) ^ uint64 (v>>63 ) } func EncodeZigZag32 (v int32 ) uint64 return uint64 ((uint32 (v) << 1 ) ^ uint32 ((v >> 31 ))) } func DecodeZigZag32 (v uint64 ) int32 return int32 ((uint32 (v) >> 1 ) ^ uint32 ((int32 (v&1 )<<31 )>>31 )) } func DecodeZigZag64 (v uint64 ) int64 return int64 ((v >> 1 ) ^ uint64 ((int64 (v&1 )<<63 )>>63 )) }
异或:相同为0,相异为1
例如下面例子,将-1 和 1 进行zigzag 编码后:
1 2 3 4 5 6 7 8 9 10 11 12 13 14 15 16 17 18 19 # -1 1111 1111 1111 1111 1111 1111 1111 1111 # d1=uint32(n) << 1 1111 1111 1111 1111 1111 1111 1111 1110 # d2=uint32(n >> 31) (负数左移添加1 )1111 1111 1111 1111 1111 1111 1111 1111 # d1 ^ d2 0000 0000 0000 0000 0000 0000 0000 0001 # 1 0000 0000 0000 0000 0000 0000 0000 0001 # n<<1 0000 0000 0000 0000 0000 0000 0000 0010 # n>>31 0000 0000 0000 0000 0000 0000 0000 0000 # 输出 0000 0000 0000 0000 0000 0000 0000 0010
6. repeated (list) 上文都没有讲解到 集合类型,protbuf 提供了 repeated关键字来提供list类型!关于 repeated 具体编码实现有两种:
目前pb中支持 wire_type=WireVarint|WireFixed32|WireFixed64进行 packed编码 !
其实可以思考一下为啥!首先假如是WireBytes 类型,那么我数据量很大,比如一个bytes数据最大可以写2G,那么我写出的时候假如用packed编码,会存在一个问题就是我写3条数据,需要内存中积压6G数据,然后算出总大小,再写出去,占用内存很大,而且解码的时候也是!PB考虑的可真细致!
1. packed 编码 可以根据官网提供的demo为例子:
1 2 3 message Test4 repeated int32 d = 4 [packed=true ]; }
假如d= [3, 270,86942] ,编码d字段的时候,会进行如下操作,先写 field_number 和 wire_type 然后再去写整个payload 大小,最后再写每一个元素!
1 2 3 4 5 22 // key (field number = 4, wire type = 2 WireBytes) 06 // payload size (6 bytes) 03 // first element (varint 3) 8E 02 // second element (varint 270) 9E A7 05 // third element (varint 86942)
2. unpacked 编码 1 2 3 message Test5 { repeated int32 d = 4 [packed = false ]; }
还是以字段d= [3, 270,86942] 进行编码,可以看到是会把每个元素作为单独的整体进行写出,比如元素一会写field_type and wire_type,然后再写 field_value,依次!!
1 2 3 4 5 6 7 00000000 20 03 20 8 e 02 20 9 e a7 05 | . .. ...|20 03 20 8 e 02 20 9 e a7 05
7. map 其实在PB中map实际上就是 repeated kv message,可以通过FieldDescriptor可以看到!
1 2 3 4 5 6 7 8 9 10 11 12 13 14 15 16 17 18 19 20 21 22 23 24 25 26 27 28 29 30 31 32 33 34 35 36 37 38 { "name" : "TestData" , "field" : [ { "name" : "t_map" , "number" : 6 , "label" : 3 , "type" : 11 , "type_name" : ".TestData.TMapEntry" , "json_name" : "tMap" }, ], "nested_type" : [ { "name" : "TMapEntry" , "field" : [ { "name" : "key" , "number" : 1 , "label" : 1 , "type" : 3 , "json_name" : "key" }, { "name" : "value" , "number" : 2 , "label" : 1 , "type" : 9 , "json_name" : "value" } ], "options" : { "map_entry" : true } } ], "enum_type" : [] }
所以编码的时候也很简单,例如
1 2 3 4 5 6 7 8 9 10 11 12 13 14 message TestMapData1 map<int64 , string > t_map = 6 ; } ==> 实际上是生成了这个代码! message TestMapData2 message TMapEntry int64 key = 1 ; string value = 2 ; } repeated TMapEntry t_map = 6 ; }
所以编码过程是一个repeated k v message的序列化方式!例如下面
1 2 3 4 5 6 7 8 9 10 11 12 13 14 15 16 t_map= {1 :"1" ,2 :"2" } => 32 05 08 01 12 01 31 32 05 08 02 12 01 32 => 32 05 08 01 12 01 31 32 05 08 02 12 01 32
8. field order pb编码不在意字段的编码顺序,也就是encode的字段顺序不一样会导致输出的数据不一样!但是解析出来的数据是一样的!
还有就是map的key顺序也会影响!
所以一般api都会指定是否支持 deterministic,如果设置为true,结果一般都会保证一样,否则可能不一样!
但是你懂得,实际上效果吧,就是开启之后一定比不开启慢,因为需要进行order!
3. pb 协议整体概括 下面这个是一个类似于bnf范式的东西,具体可以参考: PB Encode 算法
1 2 3 4 5 6 7 8 9 10 11 12 13 14 15 16 17 18 19 20 21 22 23 24 25 26 27 message := (tag value)* You can think of this as “key value”tag := (field << 3) BIT_OR wire_type, encoded as varint value := (varint|zigzag) for wire_type==0 | fixed32bit for wire_type==5 | fixed64bit for wire_type==1 | delimited for wire_type==2 | group_start for wire_type==3 | This is like “open parenthesis” group_end for wire_type==4 This is like “close parenthesis” varint := int32 | int64 | uint32 | uint64 | bool | enum, encoded as varints zigzag := sint32 | sint64, encoded as zig-zag varints fixed32bit := sfixed32 | fixed32 | float, encoded as 4-byte little-endian; memcpy of the equivalent C types (u?int32_t, float) fixed64bit := sfixed64 | fixed64 | double, encoded as 8-byte little-endian; memcpy of the equivalent C types (u?int64_t, double) delimited := size (message | string | bytes | packed), size encoded as varint message := valid protobuf sub-message string := valid UTF-8 string (often simply ASCII); max 2GB of bytes bytes := any sequence of 8-bit bytes; max 2GB packed := varint* | fixed32bit* | fixed64bit*, consecutive values of the type described in the protocol definition varint encoding: sets MSB of 8-bit byte to indicate “no more bytes” zigzag encoding: sint32 and sint64 types use zigzag encoding.
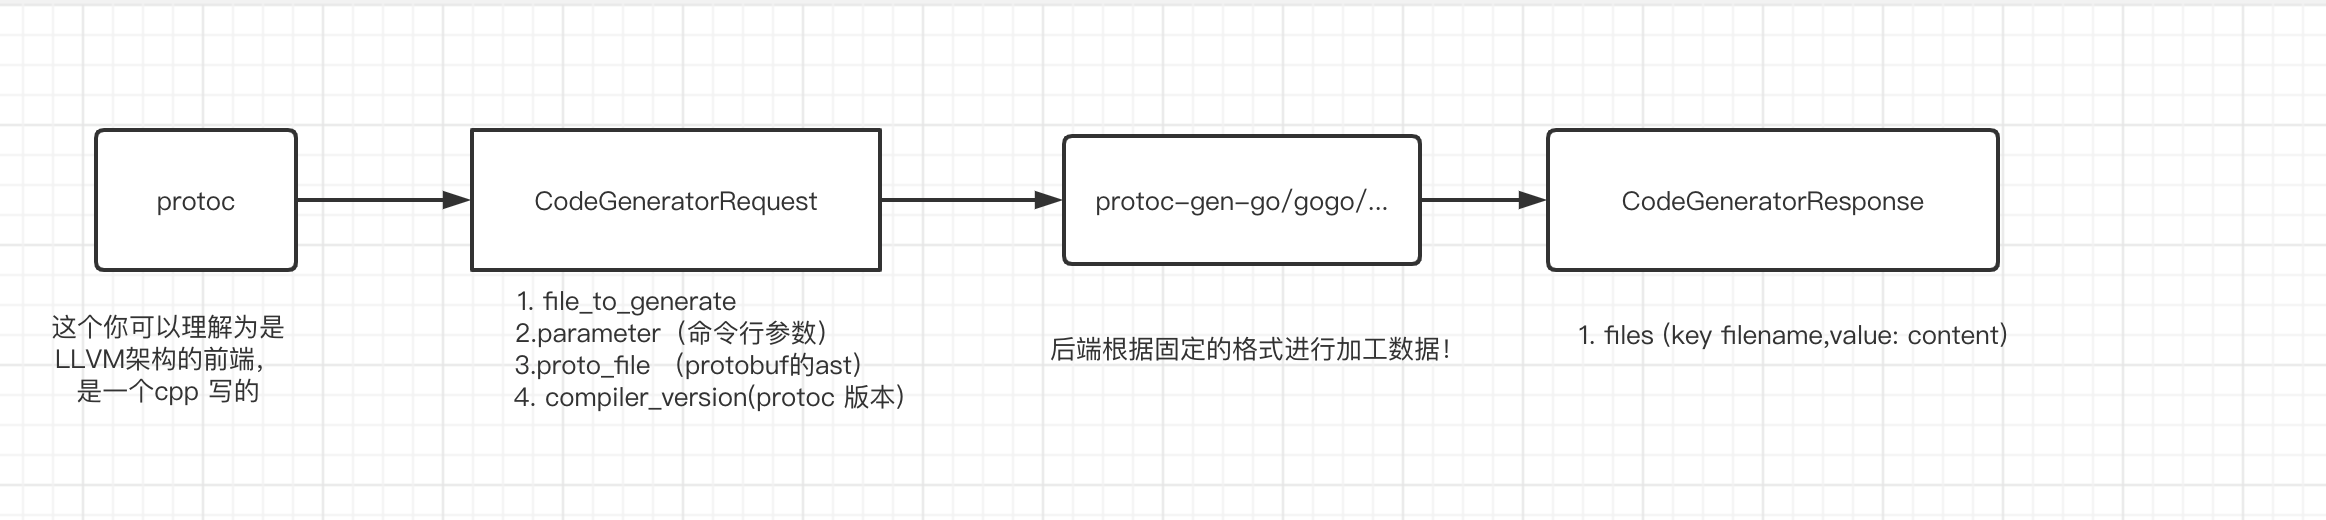
4. protoc 命令讲解 这里讲解一下protoc 的架构图,生成架构图
第一个节点protoc其实是 c++写的, https://github.com/protocolbuffers/protobuf
第二个节点是 protoc 输出的二进制报文(PB编码) CodeGeneratorRequest,具体可以看 CodeGeneratorRequest IDL定义 ,其中 SourceCode 比较难理解,可以看我的这篇文章: SourceCodeInfo介绍 !
第三个节点是 plugin 生成逻辑,可以通过标准输入获取CodeGeneratorRequest,通过标准输出写入CodeGeneratorResponse
第四个节点输出 CodeGeneratorResponse,具体可以看 CodeGeneratorResponse IDL定义
目前虽然有很多项目在解析 protoc 的 ast时,都是自己实现的词法解析和语法解析,所以假如可以把protoc封装个lib库就好了,上层可以用cgo 、 java/python native 去掉用会好很多,这里我自己用cgo封装的libprotobuf, 具体可以看我自己写的项目: https://github.com/Anthony-Dong/protobuf!
1. 自定义plugin 自己用Go语言写一个 print CodeGeneratorRequest 的生成器 1 2 3 4 5 6 7 8 9 10 11 12 13 14 15 16 17 18 19 20 21 22 23 24 25 26 27 28 29 30 31 32 33 34 35 36 37 38 39 40 41 42 43 44 45 46 47 48 49 50 51 52 53 54 55 56 57 58 59 60 61 62 63 64 65 66 67 68 69 70 71 package mainimport ( "io/ioutil" "os" "strings" "google.golang.org/protobuf/encoding/protojson" "google.golang.org/protobuf/proto" "google.golang.org/protobuf/types/pluginpb" ) func main () req := pluginpb.CodeGeneratorRequest{} resp := pluginpb.CodeGeneratorResponse{} stdIn, err := ioutil.ReadAll(os.Stdin) if err != nil { panic (err) } if err := proto.Unmarshal(stdIn, &req); err != nil { panic (err) } options := toKVOption(&req) switch options["type" ] { case "pb" : marshal, err := proto.Marshal(&req) if err != nil { panic (err) } resp.File = []*pluginpb.CodeGeneratorResponse_File{ { Name: proto.String("desc.binary" ), Content: proto.String(string (marshal)), }, } default : resp.File = []*pluginpb.CodeGeneratorResponse_File{ { Name: proto.String("desc.json" ), Content: proto.String(MessageToJson(&req, true )), }, } } respBinary, err := proto.Marshal(&resp) if err != nil { panic (err) } if _, err := os.Stdout.Write(respBinary); err != nil { panic (err) } } func toKVOption (req *pluginpb.CodeGeneratorRequest) map [string ]string kvs := strings.Split(req.GetParameter(), "," ) result := make (map [string ]string , len (kvs)) for _, kv := range kvs { kvv := strings.Split(kv, "=" ) if len (kvv) == 2 { result[kvv[0 ]] = kvv[1 ] } else { result[kvv[0 ]] = "" } } return result } func MessageToJson (v proto.Message, pretty ...bool ) string ops := protojson.MarshalOptions{Multiline: len (pretty) > 0 && pretty[0 ]} return ops.Format(v) }
其中plugin一般遵守命名规则: protoc-gen-{plugin name} , 使用 --plugin 指定自己插件的路径,使用 --{pulgin}_out 指定输出路径,使用 --{pulgin}_opt 指定parameter, 多个请参数用, 分割 1 2 3 4 5 protoc --proto_path desc --proto_path . \ --plugin=protoc-gen-print =${HOME}/go /bin/protoc-gen-print \ --print_out=${HOME}/data/print \ --print_opt=type =json,k1=v1 \ --print_opt=k2=v2 `find . -name '*.proto'`
2. 解析options (Extensions) 业务中经常拓展 protobuf.FieldOptions 定义一些注解(元信息),在代码生成中/运行时的时候特殊处理,例如如下我定义的 api.proto 文件 1 2 3 4 5 6 7 8 9 10 11 12 13 14 15 16 17 18 19 20 21 22 23 24 25 26 27 28 29 30 31 32 33 syntax = "proto2" ; package api;option go_package = "github.com/anthony-dong/protobuf/internal/pb_gen/api" ;import "google/protobuf/descriptor.proto" ;extend google.protobuf.FileOptions{ optional string android_package = 1001 ; } extend google.protobuf.FieldOptions { optional HttpSourceType source = 50101 ; optional string key = 50102 ; optional bool unbox = 50103 ; } enum HttpSourceType Query = 1 ; Body = 2 ; Header = 3 ; } extend google.protobuf.MethodOptions { optional HttpMethodType method = 50201 ; optional string path = 50202 ; } enum HttpMethodType GET = 1 ; POST = 2 ; PUT = 3 ; }
那么我们如何拿到这些信息了? 1 2 3 4 5 6 7 8 9 10 11 12 13 14 15 16 17 18 19 20 21 22 23 24 25 26 27 28 29 30 31 32 33 34 35 36 37 38 39 40 41 42 43 44 45 46 47 48 49 50 51 52 53 54 55 56 57 58 59 60 61 62 63 64 65 66 67 68 69 70 71 72 73 74 75 76 77 78 79 80 81 82 83 84 85 86 87 88 89 90 91 92 93 94 95 96 97 98 99 100 101 102 103 104 105 package mainimport ( "errors" "fmt" "reflect" "google.golang.org/protobuf/types/pluginpb" "github.com/anthony-dong/protobuf/internal/printer/api" "google.golang.org/protobuf/proto" "google.golang.org/protobuf/runtime/protoimpl" ) func readProtobufOptions (req *pluginpb.CodeGeneratorRequest) for _, file := range req.GetProtoFile() { for _, message := range file.GetMessageType() { if message.GetName() != "ImMessageRequest" { continue } for _, field := range message.GetField() { output, err := GetProtobufOptions(field.GetOptions()) if err != nil { panic (err) } fmt.Printf("%s: %#v\n" , field.GetName(), output) } } } } func GetProtobufOptions (options proto.Message) (map [string ]interface {}, error) optionKV := make (map [string ]interface {}, 0 ) var source api.HttpSourceType if isOk, err := marshalExtension(options, api.E_Source, &source); err != nil { return nil , err } else if isOk { optionKV["api.source" ] = source } var key string if isOk, err := marshalExtension(options, api.E_Key, &key); err != nil { return nil , err } else if isOk { optionKV["api.key" ] = key } var unbox bool if isOk, err := marshalExtension(options, api.E_Unbox, &unbox); err != nil { return nil , err } else if isOk { optionKV["api.unbox" ] = unbox } return optionKV, nil } func marshalExtension (opts proto.Message, e *protoimpl.ExtensionInfo, out interface {}) (bool , error) if opts == nil || reflect.ValueOf(opts).IsNil() { return false , nil } if e == nil { return false , errors.New("nil *protoimpl.ExtensionInfo parameter provided" ) } if out == nil { return false , errors.New("nil extension output parameter provided" ) } o := reflect.ValueOf(out) if o.Kind() != reflect.Ptr { return false , errors.New("out parameter must be a pointer type" ) } if !proto.HasExtension(opts, e) { return false , nil } val := proto.GetExtension(opts, e) if val == nil { return false , errors.New("extracted extension value is nil" ) } v := reflect.ValueOf(val) for v.Kind() == reflect.Ptr || v.Kind() == reflect.Interface { v = v.Elem() } for o.Kind() == reflect.Ptr || o.Kind() == reflect.Interface { if o.Kind() == reflect.Ptr && o.IsNil() { o.Set(reflect.New(o.Type().Elem())) } o = o.Elem() } if v.Type().AssignableTo(o.Type()) { o.Set(v) return true , nil } return true , fmt.Errorf("cannot assign extension type %q to output type %q" , v.Type().String(), o.Type().String()) }
1 2 Cursor: map [string ]interface {}{"api.key" :"cursor" , "api.source" :1 } ImCommons: map [string ]interface {}{"api.unbox" :true }
具体为啥非要解析 api.proto文件才能获取ExtensionInfo 呢,原因很简单,就是desc中并不会有详细的类型信息,只有 id:value 信息,可以看我解析后的信息,这里可以使用 cat /Users/bytedance/data/print/desc.binary | gtool codec pb 进行解析, gtool 可以从这里下载: https://github.com/anthony-dong/go-sdk 1 2 3 4 5 6 7 8 9 10 11 12 13 14 15 16 17 18 19 20 21 22 23 24 25 26 27 28 29 [ { "1" : "Cursor" , "3" : 1 , "4" : 1 , "5" : 3 , "7" : "2" , "8" : { "50101" : 1 , "50102" : "cursor" }, "10" : "Cursor" }, { "1" : { "9" : 1.0640046222664341e+248 }, "3" : 255 , "4" : 1 , "5" : 11 , "6" : ".im.commons.ImCommons" , "8" : { "50103" : 1 }, "10" : { "9" : 1.0640046222664341e+248 } } ]
5. pb 其他细节讲解 package(包),一个包下不能存在相同定义的message和枚举以及枚举字段! include(import),基于include_path 作为根目录的relative pata option,可以理解为是一些注解,可以对于字段、消息、枚举、method进行标记! 这里不推荐在idl里定义 option go_package=xxx java php py 之类的,因为pb在编译期可以指定!如果你们有自己的pb gen plugin可以拓展 descriptor!
1 2 3 4 5 6 7 8 9 10 11 12 13 14 15 16 17 18 19 20 21 22 23 24 25 26 27 28 29 30 31 32 33 34 35 36 37 38 39 40 syntax = "proto2" ; package api;option go_package = "github.com/anthony-dong/go-tool/internal/example/protobuf/idl_example/pb_gen/api" ;import "google/protobuf/descriptor.proto" ;extend google.protobuf.FieldOptions { optional HttpSourceType source = 50101 ; optional string key = 50102 ; optional bool unbox = 50103 ; } enum HttpSourceType Query = 1 ; Body = 2 ; Header = 3 ; } extend google.protobuf.MethodOptions { optional HttpMethodType method = 50201 ; optional string path = 50202 ; } enum HttpMethodType GET = 1 ; POST = 2 ; PUT = 3 ; }
具体可以看我的写的例子:protobuf
6. proto any 类型 例如pb文件
1 2 3 4 5 6 7 8 9 10 11 12 13 14 15 16 17 import "google/protobuf/any.proto" ;message TestAnyType optional google.protobuf.Any any = 1 ; } message Type1 string value = 1 ; } message Type2 int64 value = 1 ; } message Type3 float value = 1 ; }
此时Value可能是很多类型,比如 Type1 或者Type2或者Type3,所以此时需要一个any类型
首先我们写代码创建一个 TestAnyType 经过pb编码
1 2 3 4 5 6 7 8 9 10 11 12 13 14 15 16 17 18 func encodeData (t *testing.T) []byte data := test.TestAnyType{ Any: &anypb.Any{}, } if err := data.Any.MarshalFrom(&test.Type1{ Value: "11111" , }); err != nil { t.Fatal(err) } if result, err := proto.Marshal(&data); err != nil { t.Fatal(err) return nil } else { return result } }
如何使用了?
1 2 3 4 5 6 7 8 9 10 11 12 13 14 15 16 17 18 19 20 21 22 23 24 25 26 27 28 29 30 31 32 33 34 35 36 37 38 func TestAnyType (t *testing.T) data := encodeData(t) result := test.TestAnyType{} if err := proto.Unmarshal(data, &result); err != nil { t.Fatal(err) } t.Log(result.String()) any := result.Any if any.MessageIs((*test.Type1)(nil )) { type1 := test.Type1{} if err := any.UnmarshalTo(&type1); err != nil { t.Fatal(err) } t.Logf("type1: %s\n" , type1.String()) } if any.MessageIs((*test.Type2)(nil )) { type2 := test.Type2{} if err := any.UnmarshalTo(&type2); err != nil { t.Fatal(err) } t.Logf("type2: %s\n" , type2.String()) } if any.MessageIs((*test.Type3)(nil )) { type2 := test.Type3{} if err := any.UnmarshalTo(&type2); err != nil { t.Fatal(err) } t.Logf("type3: %s\n" , type2.String()) } }
7. 参考文章