C++模板是一种强大的工具,主要被用于实现泛型编程。泛型编程允许你编写能够处理任何类型的代码,同时保持类型安全和性能。
介绍 C++模板是一种强大的工具,主要被用于实现泛型编程。泛型编程允许你编写能够处理任何类型的代码,同时保持类型安全和性能。以下是模板在日常开发中的一些常见应用场景:
容器类 :C++标准库中的许多工具,如std::vector,std::map,std::array等,都使用模板来处理任意类型的数据。算法 :标准库中的算法如std::sort,std::find等,都使用模板来处理容器中的任意类型的数据。智能指针 :如std::unique_ptr、std::shared_ptr等,都用模板实现,可以用来处理任何类型的数据。元编程 :模板元编程(TMP)是种利用模板机制执行在编译期的计算的技术。TMP可以用来生成在编译期确定的数据结构和算法,有助于优化程序性能。类型萃取 :通过模板,我们可以编写只在某些满足特定条件的类型上起作用的代码。例如,你可以创建一个模板,它接受一个参数,并有一个静态断言来检查这个类型是否具有某个特定的成员函数。策略模式 :在运行时根据策略的改变而改变对象的行为。通过模板,你可以在编译期决定使用哪种策略,这样可以避免在运行期的性能损失。这些都是模板在日常 C++ 编程中的一些应用。注意,模板是一个深奔蓝似海的主题,你可以通过学习和实践来掌握它更多的使用方法和技巧。
from chatgpt
注意:不同语言对于泛型的底层实现是不一样的,C++是基于模版去做的,模版就比如vue/react的模版、GO的template、别的一些模版库他们都是模版,只不过C++模版主要是用来处理泛型的,然后编译器在预处理阶段将模版代码实例化(帮你代码生成)!最后 C++模版是图灵完备 语言,所以c++模版只有你想不到的,没有它做不到的,它非常的强大!
容器类 数据结构(容器)这块应该是任何语言都应该提供的!常见的数据结构就是 list/map, 然后他们引出了很多分类,C++提供了一些常见的数据结构,可以看下面的示例代码:https://godbolt.org/z/YP7WeEGPs ,我个人比较喜欢Go/Python的设计仅支持list/map别的自行实现,好处在于不需要记忆大量的的API!
1 2 3 4 5 6 7 8 9 10 11 12 13 14 15 16 17 18 19 20 21 22 23 24 25 26 27 28 29 30 31 32 33 34 35 36 37 38 39 40 41 42 43 44 45 46 47 48 49 50 51 52 53 54 55 56 57 58 59 60 61 62 63 64 65 66 67 68 69 70 71 72 73 74 75 76 77 78 79 #include <algorithm> #include <vector> #include <list> #include <queue> #include <stack> #include <map> #include <iostream> #include <unordered_map> template <typename T>void print_c (const T& t) std::cout << "[" ; std::for_each(t.begin (), t.end (), [](const auto & elem) { std::cout << elem << " ," ; }); std::cout << "]\n" ; } int main () std::vector<int > arrary_list = {1 , 2 , 3 }; print_c (arrary_list); std::list<int > linked_list = {3 , 4 , 5 }; print_c (linked_list); std::queue<int > double_end_queue; double_end_queue.push (1 ); double_end_queue.push (2 ); double_end_queue.push (3 ); std::cout << "double_end_queue [ " << double_end_queue.front () << ", " << double_end_queue.back () << "]" << "\n" ; double_end_queue.pop (); std::cout << "double_end_queue [ " << double_end_queue.front () << ", " << double_end_queue.back () << "]" << "\n" ; std::stack<int > double_end_stack; double_end_stack.push (1 ); double_end_stack.push (2 ); double_end_stack.push (3 ); std::cout << "double_end_stack-top [ " << double_end_stack.top () << "]" << "\n" ; double_end_stack.pop (); std::cout << "double_end_stack-top [ " << double_end_stack.top () << "]" << "\n" ; std::unordered_map<std::string, int > hash_map = {{"1" , 1 }, {"2" , 2 }, {"3" , 3 }}; for (const auto & kv : hash_map) { std::cout << "hash_map: [" << kv.first << ": " << kv.second << "]" << std::endl; } std::map<std::string, int > tree_map = {{"1" , 1 }, {"2" , 2 }, {"3" , 3 }}; for (const auto & kv : tree_map) { std::cout << "tree_map: [" << kv.first << ": " << kv.second << "]" << std::endl; } }
算法 算法本质上就是业务逻辑的抽象,在日常大部分需求中主要就是排序,剩余的就是一些去重过滤、类型转换等操作了,这部分核心体现的是抽象,说白了就是些工具包 !
C++里用 absl 这种工具包就行了或者别的吧,这部分存粹是造轮子所以大家不需要太关心,底层算法自己了解一下就行了!
1 2 3 4 5 6 7 8 9 10 11 12 13 14 15 16 17 18 #include <algorithm> #include <vector> #include <iostream> template <typename T>void sort_desc (std::vector<T>& arr) std::sort (arr.begin (), arr.end (), [](auto i, auto j) { return i > j; }); } int main () std::vector<int > arr = {1 , 2 , 3 , 4 }; sort_desc (arr); for (const auto & item : arr) { std::cout << item << ", " ; } }
这里我以最简单的快速排序为例子,临时写的,代码写的比较垃圾见谅
1 2 3 4 5 6 7 8 9 10 11 12 13 14 15 16 17 18 19 20 21 22 23 24 25 26 27 28 29 30 31 32 33 34 35 36 37 38 39 40 41 42 43 44 45 46 47 48 49 50 51 52 53 54 55 56 57 58 59 60 #include <vector> #include <iostream> void swap (std::vector<int >& arr, int i, int j) int tmp = arr[j]; arr[j] = arr[i]; arr[i] = tmp; } int quick_sort_helper (std::vector<int >& arr, int left, int right) if (arr.size () <= 1 ) { return left; } int flag = arr[left]; int flag_index = left; left = left + 1 ; while (right != left) { while (arr[right] > flag && right > left) { right--; } while (arr[left] < flag && left < right) { left++; } if (left != right) { swap (arr, left, right); } } if (flag < arr[left]) { return flag_index; } swap (arr, flag_index, left); return left; } int quick_sort_helper_gpt (std::vector<int >& array, int low, int high) int pivot = array[low]; while (low < high) { while (low < high && array[high] >= pivot) --high; array[low] = array[high]; while (low < high && array[low] <= pivot) ++low; array[high] = array[low]; } array[low] = pivot; return low; } int main () std::vector<int > arr = {5 , 3 , 4 , 2 , 6 , 1 , 7 }; std::cout << quick_sort_helper (arr, 0 , int size () - 1 )) << std::endl; print (arr); }
那么这个例子有个问题,仅支持 std::vector 和 int 类型,怎么解决呢?此时就需要使用模版了
1
2
3
4
5
6
7
8
9
10
11
12
13
14
15
16
17
18
19
20
21
22
23
24
25
26
27
28
29
30
31
32
33
34
35
36
37
38
39
40
41
42
43
44
45
46
template <typename T, template <typename ...> class Array >void swap (Array<T>& arr, typename Array<T>::size_type i, typename Array<T>::size_type j) int tmp = arr[j]; arr[j] = arr[i]; arr[i] = tmp; } template <typename T, template <typename ...> class Array >int quick_sort_helper (Array<T>& arr, typename Array<T>::size_type left, typename Array<T>::size_type right) template <typename T, template <typename ...> class Array >void quick_sort (Array<T>& arr, typename Array<T>::size_type left, typename Array<T>::size_type right) if (left >= right) { return ; } auto index = quick_sort_helper (arr, left, right); quick_sort (arr, left, index - 1 ); quick_sort (arr, index + 1 , right); } template <typename T, template <typename ...> class Array >int quick_sort_helper (Array<T>& arr, typename Array<T>::size_type left, typename Array<T>::size_type right) if (arr.size () <= 1 ) { return left; } int flag = arr[left]; int flag_index = left; left = left + 1 ; while (right != left) { while (arr[right] > flag && right > left) { right--; } while (arr[left] < flag && left < right) { left++; } if (left != right) { swap (arr, left, right); } } if (flag < arr[left]) { return flag_index; } swap (arr, flag_index, left); return left; }
模版元编程 (TMP) 这个太难了,不建议学习,直接pass掉吧,下面这种简单例子,照葫芦画瓢还行,复杂一点的直接就废了看不懂,当你阅读C++模版+模版动态参数的时候那么久该放弃了,虽然C++17提供了一些模版动态参数表达式,有兴趣可以看下这个文章 C++17 constexpr
1 2 3 4 5 6 7 8 9 10 11 12 13 14 15 16 17 18 19 template <unsigned int n>struct factorial { enum :unsigned int { value = n * factorial<n - 1 >::value }; }; template <>struct factorial <0 > { enum :unsigned int { value = 1 }; }; int main () constexpr unsigned int fact_5 = factorial<5 >::value; std::cout << "5! = " << fact_5 << '\n' ; }
实际上我们可以使用 constexpr 也可以实现类似的效果
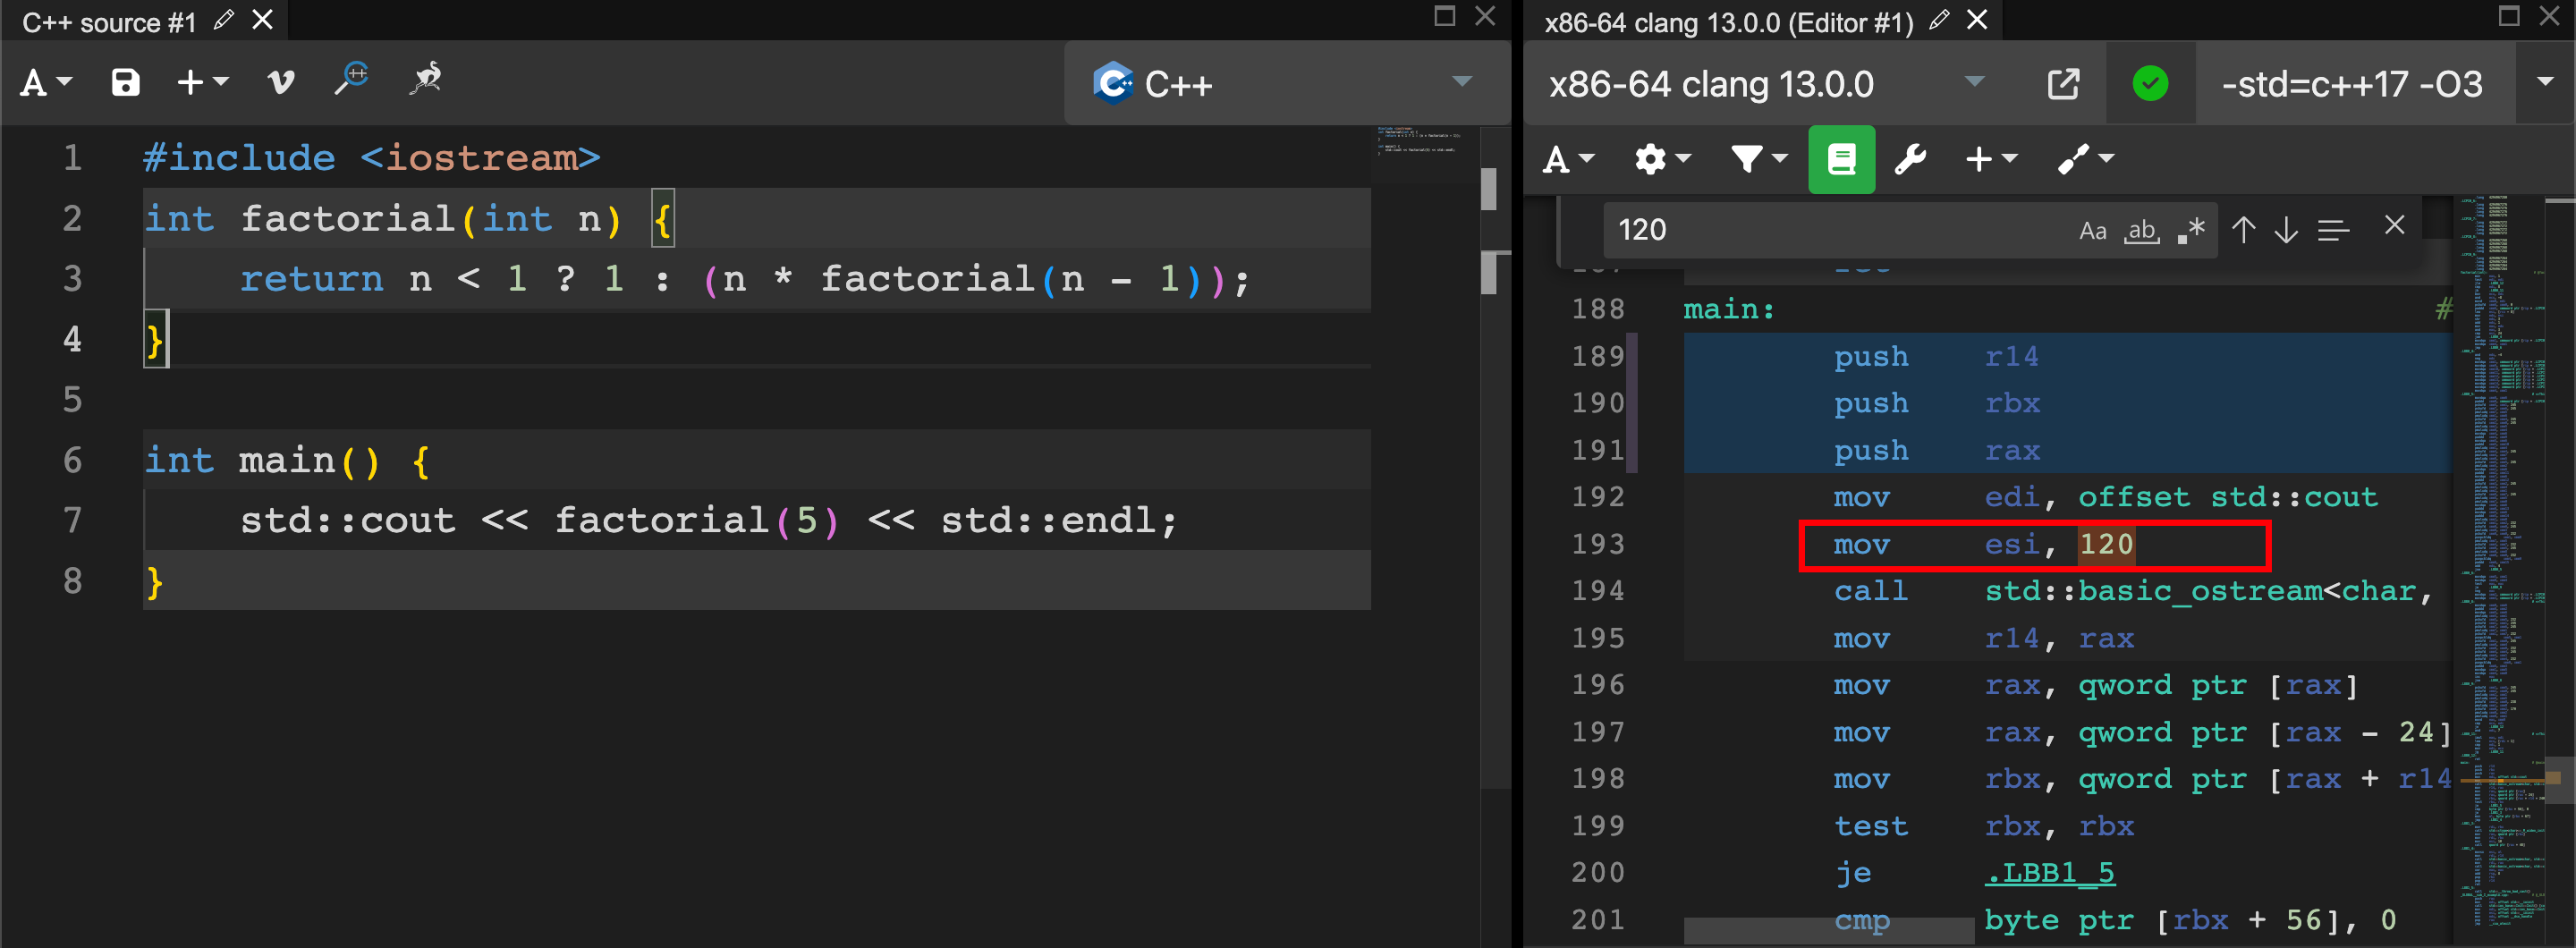
1 2 3 4 5 6 7 8 #include <iostream> constexpr int factorial (int n) return n < 1 ? 1 : (n * factorial (n - 1 )); } int main () std::cout << factorial (5 ) << std::endl; }
最后说实话对于这种存粹的数值计算,C++的编译器已经给你做了,不信我们把 constexpr 去了开启 -O3 优化,代码链接: https://godbolt.org/z/e5Thh7GYG ,所以大部分情况下我们没有编译器聪明,所以这种编译计算的技巧说实话不如交给编译器去做,我们呢只负责写代码就行了!!
类型萃取 (trait) 对于大部分C++开发者来说,这个我觉得是C++模版的核心了,因此我们需要根据trait需要编写一些复杂的模版代码!在C++ 中type_traits 头文件已经提供了大量的trait函数,实际上我们一些简单的trait直接使用它提供的就行了!
trait是C++类型处理的核心实现,因为C++这个语言不会在提供runtime阶段提供类型判断,即大部分涉及到类型判断的逻辑都需要在编译阶段解决,这个原因也是为了代码的性能,即模版不会带到运行时!
trait 类型 下面是简单实现了一个 is_integral<T> 的trait,本质上是用了C++类模版的重载实现的,相对来说比较简单和易读!
代码地址: https://godbolt.org/z/hGvMrPrbW
1 2 3 4 5 6 7 8 9 10 11 12 13 14 15 16 17 18 19 20 21 #include <type_traits> #include <iostream> template <typename T>struct is_integral :template <>struct is_integral <char > : std::true_type {};template <>struct is_integral <short > : std::true_type {};template <>struct is_integral <int > : std::true_type {};template <>struct is_integral <long > : std::true_type {};template <typename T>constexpr bool is_integral_v = is_integral<T>::value;int main () std::cout << is_integral_v<std::string> << std::endl; std::cout << is_integral_v<int > << std::endl; }
上面例子显然是最简单的,日常需求大部分trait类型基本都可以参考上面这种写法,不过像std::is_convertible 和 std::is_same 这种实现可能会和上诉这个类型判断有差异的,感兴趣的人可以详细了解下!
trait 方法 例如我要判断一个类型是否有 std::string to_string() 方法? 通常我们都是定义一个类去判断,这种比较方便,定义方法的比较少!
下面代码本质上就是利用了 SFINAE (Substitution Failure Is Not An Error) 这个也是C++20之前模版编程的核心了,其本质是一种模版匹配机制,即我会在所有的模版定义中去匹配,哪个匹配成功用哪个,其次它匹配不会去匹配你的代码逻辑只会匹配你的模版申明,注意这个!
代码地址: https://godbolt.org/z/adG7nMGWf ,这个例子核心就是了解下 std::declval 的用法,我个人感觉这个属于编译器的一个test行为和decltype本质上应该是一样的!
1 2 3 4 5 6 7 8 9 10 11 12 13 14 15 16 17 18 19 20 21 22 23 24 25 26 27 28 29 30 31 32 33 34 35 36 37 38 39 40 41 #include <type_traits> #include <string> #include <iostream> template <typename T, typename = void >struct has_to_string_func : std::false_type {}; template <typename T>struct has_to_string_func <enable_if_t <std::is_same_v<decltype (std::declval<T>().to_string ()), std::string>>> : std::true_type {};struct Test { std::string to_string () ; }; struct Test2 { std::string to_string2 () ; }; struct Test3 { void to_string () }; int main () std::cout << has_to_string_func<Test>::value << std::endl; std::cout << has_to_string_func<Test2>::value << std::endl; std::cout << has_to_string_func<Test3>::value << std::endl; }
实现to_string方法 上面这个例子实际上我们会发现有个缺点即需要用户在类里面申明to_string() 方法,这个缺点太坑了侵入型比较大,而且可能不同框架对于 to_string() 方法的函数签名要求不一样,所以通常做法都是通过模版类特化的方式实现 to_string() 方法!
我们知道Go支持interface, rust支持trait,实际上两者对于此场景提供了很好的支持,这里我觉得比较方便的是rust的trait,因此我们可以参考rust的trait的实现来实现一个可拓展的 Stringer trait,说实话我是参考的libfmt! (注意: rust大部分思想应该来源于c++,只不过取其精华罢了)
定义模版类Stringer 1 2 3 4 5 6 7 #include <string> template <typename T>struct Stringer { Stringer () = delete ; std::string to_string (T t) = delete ; };
实现一个 Stringer 类型的trait,代码地址: https://godbolt.org/z/YxjfMa6qd 1 2 3 4 5 6 7 8 9 10 11 12 13 14 15 16 17 18 19 20 21 22 23 24 25 26 27 28 29 30 31 32 33 34 35 36 37 38 39 #include <string> #include <type_traits> #include <iostream> template <typename T>struct Stringer { Stringer () = delete ; std::string to_string (T t) = delete ; }; template <typename T, typename = void >struct is_stringer : std::false_type {}; template <typename T>struct is_stringer <enable_if_t <std::is_same_v<decltype (std::declval<Stringer<T>>().to_string (std::declval<T>())), std::string>>> : std::true_type {};struct Test {template <>struct Stringer < std::string to_string (const Test& t) { return "hello world" ; } }; struct Test2 {template <>struct Stringer <struct Test3 {int main () std::cout << is_stringer<Test>::value << std::endl; std::cout << is_stringer<Test2>::value << std::endl; std::cout << is_stringer<Test3>::value << std::endl; }
至此呢我们就可以实现一个可拓展比较高的 to_string 方法,代码地址: https://godbolt.org/z/Tq99aq3MP 1 2 3 4 5 6 7 8 9 10 11 12 13 14 15 16 17 18 19 20 21 22 23 24 25 26 27 28 29 30 31 32 33 34 35 36 37 38 39 40 41 42 43 44 45 46 47 48 49 50 51 52 53 54 55 56 57 58 59 60 61 62 63 64 65 66 67 68 69 70 71 72 73 74 75 76 77 78 79 80 81 82 83 #include <iostream> #include <type_traits> #include <string> template <typename T>struct Stringer { Stringer () = delete ; std::string to_string (T t) = delete ; }; template <typename T, typename = void >struct is_stringer : std::false_type {}; template <typename T>struct is_stringer <enable_if_t <std::is_same_v<decltype (std::declval<Stringer<T>>().to_string (std::declval<T>())), std::string>>> : std::true_type {};template <typename T, typename = void >struct has_to_string_func : std::false_type {}; template <typename T>struct has_to_string_func <enable_if_t <std::is_same_v<decltype (std::declval<T>().to_string ()), std::string>>> : std::true_type {};template <typename T>inline std::enable_if_t <has_to_string_func<T>::value, std::string> to_string (T t) { return t.to_string (); } template <typename T>inline std::enable_if_t <is_stringer<T>::value, std::string> to_string (T t) { return (Stringer<T>{}).to_string (t); } template <typename T>inline std::enable_if_t <std::is_integral_v<T> || std::is_floating_point_v<T>, std::string> to_string (T t) { return std::to_string (t); } template <typename T>inline std::enable_if_t <std::is_same_v<decltype (std::string (std::declval<T>())), std::string>, std::string> to_string (T t) { return t; } inline std::string to_string (bool b) return b ? "true" : "false" ; } struct Test1 { std::string to_string () { return "Test1(" + std::string ("name=" ) + name + ", f2=" + ::to_string (age) + ")" ; }; std::string name; int age; }; struct Test2 { std::string f1; int f2; }; template <>struct Stringer < std::string to_string (const Test2& t) { return "Test2(" + std::string ("f1=" ) + t.f1 + ", f2=" + ::to_string (t.f2) + ")" ; }; }; int main () std::cout << to_string (Test1{.name = "tom" , .age = 18 }) << std::endl; std::cout << to_string (Test2{.f1 = "F1" , .f2 = 2 }) << std::endl; std::cout << to_string (false ) << std::endl; std::cout << to_string (true ) << std::endl; std::cout << to_string (1.11 ) << std::endl; std::cout << to_string (1111 ) << std::endl; std::cout << to_string ("1111" ) << std::endl; std::cout << to_string ("1111" ) << std::endl; }
备注 rust-trait 上诉我讲到了rust的trait,这里我们可以简单写一个Stringer trait,说实话我发现rust的写法真像python+typehints
1 2 3 4 5 6 7 8 9 10 11 12 13 14 15 16 17 18 19 20 21 22 23 24 25 26 27 28 29 30 31 32 33 34 35 pub struct Tweet pub username: String , pub content: String , pub reply: bool , pub retweet: bool , } use hello_cargo::Tweet;pub trait Stringer fn to_string self ) -> String ; } impl Stringer for Tweet { fn to_string self ) -> String { format! ("Tweet username: {}, content: {}" , self .username, self .content) } } pub fn test impl Stringer) { println! ("test func: {}" , item.to_string()); } fn main let tweet = Tweet { username: String ::from("xiaoming" ), content: String ::from("from chinese" ), reply: false , retweet: false , }; println! ("Breaking news {}" , tweet.to_string()); test(&tweet); }
执行 1 2 3 4 5 6 ➜ bazel_simple git:(master) ✗ cargo run Compiling hello_cargo v0.1.0 (/Users/bytedance/go/src/github.com/anthony-dong/bazel_simple) Finished dev [unoptimized + debuginfo] target(s) in 0.23s Running `target/debug/hello_cargo` Breaking news Tweet username: xiaoming, content: from chinese test func: Tweet username: xiaoming, content: from chinese
libfmt 我个人觉得你如果能写出来 libfmt 这种框架,那么你对于C++的模版的理解已经超越了99% 的人了!
下面我们可以简单使用下libfmt实现一个logger库,自己编译的话选择cmake自己构建下就行了!
cpp/log/logger.h 文件1 2 3 4 5 6 7 8 9 10 11 12 13 14 15 16 17 18 19 20 21 22 23 24 25 26 27 28 29 30 31 32 33 34 35 36 37 38 39 40 41 42 43 44 45 46 #include <iostream> #include "fmt/core.h" #include <cmath> #include <string> #include <chrono> #include "cpp/utils/time.h" #include <unordered_map> #include "absl/time/time.h" #include "absl/time/clock.h" namespace cpp::log {enum class Level { Debug, Info, Warn, Error, }; #define LOG_NAMESPACE cpp::log #define INFO(...) LOG_NAMESPACE::Log(LOG_NAMESPACE::Level::Info, __FILE__, __LINE__, __FUNCTION__, __VA_ARGS__) template <typename ... Args>inline void Log (Level level, const char * filename, int line, const char * func, fmt::format_string<Args...> format, Args&&... args) auto file_base = [](const char * name) -> std::string { const std::string_view file (name); const size_t index = file.find_last_of ('/' ); if (index == -1 ) { return name; } return {file.begin () + index + 1 , file.end ()}; }; using clock = std::chrono::system_clock; static std::unordered_map<Level, std::string> level_string_map = { {Level::Debug, "DEBUG" }, {Level::Info, "INFO" }, {Level::Warn, "WARN" }, {Level::Error, "ERROR" }, }; auto level_name = level_string_map[level]; if (level_name.empty ()) { level_name = "-" ; } fmt::println ("[{}] {} {}:{} {}" , level_name, absl::FormatTime ("%Y-%m-%d %H:%M:%S" , absl::Now (), absl::LocalTimeZone ()), file_base (filename), line, fmt::format(format, std::forward<Args>(args)...)); } }
test/log/logger_test.cpp 文件1 2 3 4 5 6 7 8 9 10 11 12 13 14 15 16 17 18 19 20 21 22 23 24 25 26 27 28 29 30 31 32 33 34 35 36 37 38 39 #include "gtest/gtest.h" #include "cpp/log/logger.h" #include <source_location> struct MyTest { int age; std::string name; }; struct Nop {template <>struct fmt : template <typename Context> constexpr auto parse (Context& ctx) return ctx.begin (); } }; template <> struct fmt : template <typename Context> auto format (const MyTest& data, Context& ctx) return fmt::format_to(ctx.out (), "name: {}. age: {}" , data.name, data.age); } }; TEST (LogTest, Print) { INFO ("hello {}" , "world" ); MyTest data{.age = 1 , .name = "hello" }; INFO ("MyTest {}" , data); cpp::log::Log (cpp::log::Level::Debug, "logger_test.cpp" , 7 , "" , "hello {}" , "1111" ); std::source_location location = std::source_location::current (); INFO ("source_location: filename: {}, line: {}" , location.file_name (), location.line ()); }:
3.output
1 2 3 4 [INFO] 2023-12-18 16:13:22 logger_test.cpp:29 hello world [INFO] 2023-12-18 16:13:22 logger_test.cpp:32 MyTest name: hello. age: 1 [DEBUG] 2023-12-18 16:13:22 logger_test.cpp:7 hello 1111 [INFO] 2023-12-18 16:13:22 logger_test.cpp:38 source_location: filename: /Users/bytedance/go/src/github.com/anthony-dong/cpp/test/log/logger_test.cpp, line: 37
模版匹配机制 我们首先写一个 to_string 函数 1 2 3 4 5 6 7 8 9 10 11 12 13 #include <string> #include <iostream> #include <type_traits> template <typename T>std::string to_string (T t) { return std::to_string (t); } int main () std::cout << to_string (1 ) << "\n" ; std::cout << to_string (true ) << "\n" ; }
我们发现这个函数不满足我们需求,比如参数是一个 string 类型上面代码走不通,因此我改成了,此时问题来了,编译器直接爆错redefinition of 'to_string',这个报错我理解大家都懂重复定义了函数! 1 2 3 4 5 6 7 8 9 template <typename T>std::string to_string (T t) { return std::to_string (t); } template <typename T>std::string to_string (T t) { return t; }
我们继续改,解决这个问题,那么此时函数签名不一致了,但是我们执行报错说 call to 'to_string' is ambiguous 1 2 3 4 5 6 7 8 9 10 11 12 13 14 15 16 17 18 19 #include <string> #include <iostream> #include <type_traits> template <typename T>std::string to_string (T t) { return std::to_string (t); } template <typename T>std::enable_if_t <std::is_convertible_v<T, std::string>, std::string> to_string (T t) { return t; } int main () std::cout << to_string (1 ) << "\n" ; std::cout << to_string (true ) << "\n" ; std::cout << to_string ("1111" ) << "\n" ; }
继续改,我们需要解决二义性问题,即一个类型不能匹配成功两个函数,比如上面这个例子就是输入参数 t="1111"它既可以匹配#1的模版,也可以匹配 #2的模版 ,这个就是二义性问题,即不能同时匹配多个模版函数! 1 2 3 4 5 6 7 8 9 10 11 12 13 14 15 16 17 18 19 #include <string> #include <iostream> #include <type_traits> template <typename T>std::enable_if_t <std::is_same_v<decltype (std::to_string (std::declval<T>())), std::string>, std::string> to_string (T t) { return std::to_string (t); } template <typename T>std::enable_if_t <std::is_convertible_v<T, std::string>, std::string> to_string (T t) { return t; } int main () std::cout << to_string (1 ) << "\n" ; std::cout << to_string (true ) << "\n" ; std::cout << to_string ("1111" ) << "\n" ; }
上面例子我们发现写法非常的丑陋,大量使用std::enable_if, 本质上concept就是替换这种写法的,功能是一模一样的!我们可以使用 concept重写上面的代码,注意concept是c++20提供的!其次concept的报错上会优于模版!
类型约束 类型约束,其实就是要替代上面讲到的trait类型,写法也比较简单,这里不多赘述了,具体可以看下面的代码: https://godbolt.org/z/xze71f49W
1 2 3 4 5 6 7 8 9 10 11 12 13 14 15 16 17 18 19 20 21 22 23 #include <concepts> #include <type_traits> #include <iostream> template <typename T>concept is_numeric = std::same_as<T, int > || std::same_as<T, float >;template <typename T, typename = void >struct is_numeric_c : std::false_type {}; template <typename T>struct is_numeric_c <enable_if_t <std::is_same_v<T, int > || std::is_same_v<T, float >>> : std::true_type {};int main () std::cout << is_numeric<int > << std::endl; std::cout << is_numeric<float > << std::endl; std::cout << is_numeric<bool > << std::endl; std::cout << is_numeric_c<int >::value << std::endl; std::cout << is_numeric_c<float >::value << std::endl; std::cout << is_numeric_c<bool >::value << std::endl; }
复杂类型约束 复杂类型约束, 这里我们可以实现类似于 Go的 Writer/Reader 接口,具体可以看下面这个例子:https://godbolt.org/z/PfrrrfjGG
1 2 3 4 5 6 7 8 9 10 11 12 13 14 15 16 17 18 19 20 21 22 23 24 25 26 27 28 29 30 31 32 33 34 35 36 37 38 39 40 41 42 43 44 45 46 47 48 49 50 51 52 53 54 55 56 57 58 59 60 61 62 63 64 65 66 67 68 69 70 71 72 73 74 75 76 77 78 79 80 81 82 83 84 85 86 87 88 89 90 91 92 93 94 95 96 97 98 99 #include <concepts> #include <type_traits> #include <iostream> #include <cassert> template <typename T>concept Reader = requires requires requires { t.Read (buffer) } -> std::same_as<size_t >; }; }; template <typename T>concept Writer = requires requires requires { t.Write (buffer) } -> std::same_as<size_t >; }; }; template <typename T>concept ReadWriter = Reader<T> && Writer<T>;struct StringBuffer { explicit StringBuffer (std::string&& buffer) : buffer_(std::move(buffer)) { w = buffer_.size (); r = 0 ; }; size_t Read (std::string& buffer) auto size = buffer.size (); if (w == r) { return 0 ; } if (w - r < size) { size = w - r; } std::copy (buffer_.begin () + long begin () + long long begin ()); r = r + size; return size; } size_t Write (std::string& buffer) buffer_.append (buffer, 0 , buffer.size ()); w = w + buffer.size (); return buffer.size (); } size_t Write (std::string&& buffer) return Write (buffer); } private : size_t r, w; std::string buffer_; }; template <ReadWriter Rw>size_t ReadAll (Rw& reader, std::string& buffer) buffer.clear (); std::string bw{}; bw.resize (16 ); while (true ) { if (auto size = reader.Read (bw); size >= 0 ) { if (size == 0 ) { break ; } buffer.append (bw, 0 , size); } } return buffer.size (); } int main () StringBuffer sb ("C++是世界上最好的语言" ) ; sb.Write ("!!!!!" ); std::string buffer{}; ReadAll (sb, buffer); std::cout << buffer << std::endl; }
实现to_string方法 我们还是以上面trait里讲到的 to_string 方法进行重写,代码地址: https://godbolt.org/z/vqxfqEY66
1 2 3 4 5 6 7 8 9 10 11 12 13 14 15 16 17 18 19 20 21 22 23 24 25 26 27 28 29 30 31 32 33 34 35 36 37 38 39 40 41 42 43 44 45 46 47 48 49 50 51 52 53 54 55 56 57 58 59 60 61 62 63 64 65 66 67 68 69 70 71 72 73 74 75 76 77 78 79 80 81 82 83 84 85 86 87 88 89 90 91 92 93 94 #include <iostream> #include <type_traits> #include <string> #include <concepts> template <typename T>struct Stringer { Stringer () = delete ; std::string to_string (T t) = delete ; }; template <typename T>concept has_to_string_func = requires { t.to_string () } -> std::same_as<std::string>; }; template <typename T>concept is_stringer = requires requires requires { s.to_string (t) } -> std::same_as<std::string>; }; }; template <has_to_string_func T>inline std::string to_string (T t) return t.to_string (); } template <is_stringer T>inline std::string to_string (T t) return (Stringer<T>{}).to_string (t); } template <typename T> requires std::is_integral_v<T> || std::is_floating_point_v<T> inline std::string to_string (T t) return std::to_string (t); } template <typename T> requires std::convertible_to<T, std::string> inline std::string to_string (T t) return t; } inline std::string to_string (bool b) return b ? "true" : "false" ; } struct Test1 { std::string to_string () { return "Test1(" + std::string ("name=" ) + name + ", f2=" + ::to_string (age) + ")" ; }; std::string name; int age; }; struct Test2 { std::string f1; int f2; }; template <>struct Stringer < std::string to_string (const Test2& t) { return "Test2(" + std::string ("f1=" ) + t.f1 + ", f2=" + ::to_string (t.f2) + ")" ; }; }; int main () std::cout << to_string (Test1{.name = "tom" , .age = 18 }) << std::endl; std::cout << to_string (Test2{.f1 = "F1" , .f2 = 2 }) << std::endl; std::cout << to_string (false ) << std::endl; std::cout << to_string (true ) << std::endl; std::cout << to_string (1.11 ) << std::endl; std::cout << to_string (1111 ) << std::endl; std::cout << to_string ("1111" ) << std::endl; std::cout << to_string ("1111" ) << std::endl; }
其他 模版与左右值的关系 总结 C++的模版可以说是C++的灵魂所在,例如上面的例子我们通过类模版的特化就很轻松的实现了一个 rust 的trait 类型哇,我们用 concept/template 就实现了类似于Go的Interface呢,所以C++的技巧太多了,平时可以多阅读一些优秀的代码,自己也会变得优秀!
我理解日常需求中我们只要学会了本文讲到的实际上已经基本够用了!
其次模版相关的文章太少了,大家有不懂的代码和语法直接问GPT就行了,说实话我也是问人家的,然后自己多动手!