C++ 作为面向对象语言,其次面向对象语言的重要特性封装、继承、多态,所以理解继承底层设计对于我们学习C++是非常重要的,其次他是C++的灵魂所在,本人也是走了些弯路所以打算深度学习一下!
环境 GCC 8.3.0(本人的运行环境) 1 2 3 4 5 # 查看class 的结构信息(Dump class hierarchy information ) g ++ -std =17 -O0 -fdump-lang-class main .cpp # 编译 g ++ -std =17 -O0 main.cpp -o main
Clang 13.0.0 1 2 # 查看class 的结构信息 clang ++ -std =17 -O0 -c main.cpp -Xclang -fdump-vtable-layouts
例子 1 2 3 4 5 6 7 8 9 10 11 12 13 14 15 16 17 18 19 20 21 22 23 24 25 26 27 28 29 30 31 32 33 34 35 36 37 38 39 40 41 42 43 44 45 46 47 48 49 50 51 52 53 54 #include <iostream> struct Base { virtual void test (int x) std::cout << "Base int x=" << x << std::endl; } void test (double x) std::cout << "Base double x=" << x << std::endl; } }; struct Derived : void test (int x) std::cout << "Derived int x=" << x << std::endl; } void test (double x) std::cout << "Derived double x=" << x << std::endl; } }; void testRef (Base& b) b.test (1 ); b.test (1.1 ); } void test (Base b) b.test (1 ); b.test (1.1 ); } int main () Base* b = new Derived (); b->test (1 ); b->test (1.1 ); testRef (*b); test (*b); return 0 ; }
虚表 C++的虚函数底层实现上采用的都是虚表(virtual table),虚表中会把虚函数真实的函数地址记录下来,方便函数调用直接使用,因此虚函数的性能会略差一下因为多了一次寻址! 注意: 这个只是大部分编译器的实现,例如GCC!
例如下面例子TestA定义了虚函数foo1,那么TestA会生成一个虚函数表,其中定义了 foo1 指向 TestA::foo1 , 其中TestB继承自A它会继承A的虚函数表,如果重写会覆盖重写的函数,下面这个例子B的虚函数表中定义了一个 foo1 指向 TestA::foo1 ,TestC继承了TestB,重写了foo1方法,因此TestC的虚表中变成了TestC::foo1 。
1 2 3 4 5 6 7 8 9 10 11 12 13 14 15 16 17 18 19 20 21 22 23 #include <iostream> struct TestA { virtual void foo1 () std::cout << "TestA.foo1\n" ; } }; struct TestB :virtual TestA {};struct TestC :virtual TestB { void foo1 () std::cout << "TestC.foo1\n" ; } }; int main () TestA *ab = new TestB (); ab->foo1 (); TestA *ac = new TestC (); ac->foo1 (); }
虚表是C++元信息的体现,它记录了虚函数的函数地址,但是C++本质上并不会为runtime阶段提供类型的元信息,例如类型的字段、函数信息等,所以C++不支持反射。但是c++是一个直接面向内存的语言,只要拿到了内存什么语法限制(private?const?)都不存在了。
虚函数 虚函数是继承的核心,派生类允许重写父类的虚函数,进而实现多态!
代码示例: https://godbolt.org/z/TEEsYra7f 或者 https://coliru.stacked-crooked.com/a/9895523dd69257b6
单继承 1 2 3 4 5 6 7 8 9 10 11 12 13 14 15 16 17 18 19 20 21 22 23 24 25 26 27 28 29 30 31 32 33 34 35 36 37 38 39 40 41 42 43 44 45 46 47 48 49 50 51 52 53 54 55 56 57 58 59 60 61 62 63 64 65 66 67 68 69 70 71 72 73 74 75 76 77 78 79 80 81 82 83 84 85 #include <iostream> struct TestA { virtual void foo1 () std::cout << "TestA.foo1\n" ; } virtual void foo2 () std::cout << "TestA.foo2\n" ; } void foo3 () std::cout << "TestA.foo3\n" ; } long arr[3 ]; }; struct TestB : virtual void foo1 () std::cout << "TestB.foo1\n" ; } virtual void foo3 () std::cout << "TestB.foo3\n" ; } long arr[3 ]; }; struct TestC : virtual void foo4 () std::cout << "TestC.foo4\n" ; } }; struct TestAMemory { struct TestATable { void void }; TestATable *vptr; long arr[3 ]; }; struct TestBMemory { struct TestBTable { void void void }; TestBTable *vptr; long arra[3 ]; long arrb[3 ]; }; int main () TestA *a = new TestB (); a->foo1 (); a->foo2 (); a->foo3 (); ((TestB *)a)->foo1 (); ((TestB *)a)->foo2 (); ((TestB *)a)->foo3 (); TestBMemory *bb = (TestBMemory *)(a); bb->vptr->foo1 (); bb->vptr->foo2 (); bb->vptr->foo3 (); bb->arra[0 ] = 111 ; bb->arrb[0 ] = 222 ; std::cout << "(TestA)arr[0]: " << a->arr[0 ] << "\n" ; std::cout << "(TestB)arr[0]: " << ((TestB *)a)->arr[0 ] << "\n" ; TestAMemory *aa = (TestAMemory *)(new TestA ()); aa->vptr->foo1 (); aa->vptr->foo2 (); }
那么具体是如何实现的呢? 可以通过 g++ -O0 -fdump-lang-class main.cpp dump 类信息
1 2 3 4 5 6 7 8 9 10 11 12 13 14 15 16 17 18 19 20 21 22 23 24 25 26 27 28 29 30 31 32 33 34 35 36 37 38 39 40 41 42 43 44 45 46 47 48 Vtable for TestA TestA::_ZTV5TestA: 4 entries 0 (int 0 8 (int 16 (int 24 (int Class TestA size=32 align=8 base size=32 base align=8 TestA (0x0 x7fdde31d2960) 0 vptr=((& TestA::_ZTV5TestA) + 16 ) Vtable for TestB TestB::_ZTV5TestB: 5 entries 0 (int 0 8 (int 16 (int 24 (int 32 (int Class TestB size=56 align=8 base size=56 base align=8 TestB (0x0 x7fdde322d068) 0 vptr=((& TestB::_ZTV5TestB) + 16 ) TestA (0x0 x7fdde31d2de0) 0 primary-for TestB (0x0 x7fdde322d068) Vtable for TestC TestC::_ZTV5TestC: 6 entries 0 (int 0 8 (int 16 (int 24 (int 32 (int 40 (int Class TestC size=56 align=8 base size=56 base align=8 TestC (0x0 x7f639bfee680) 0 vptr=((& TestC::_ZTV5TestC) + 16 ) TestB (0x0 x7f639bfee6e8) 0 primary-for TestC (0x0 x7f639bfee680) TestA (0x0 x7f639bfd7780) 0 primary-for TestB (0x0 x7f639bfee6e8)
总结:
可以发现当定义了虚函数那么此时会生成一个虚函数表,虚函表记录了虚函数的函数地址,例如 TestA 内部会定义一个 vptr 指向 Vtable for TestA + 16 ,即 (int (*)(...))TestA::foo1 函数开始
TestB 继承了 TestA,TestB内部也定义了一个 vptr 指向 Vtable for TestB , 定义了其申明的虚函数
TestC 继承 TestB ,此时也只会有一份vptr指向 vtable testc
单继承仅会有一个 vptr ,指向其自己的 vtable
多继承 C++是支持多继承的,这个也是与Java等语言的区别(C++不支持接口Interface),其次多继承会比较复杂,比如涉及到交叉/菱形继承的问题,我们可以看下C++是符合实现多继承的!
继续上面那个例子,我们新增一个结构体, D 继承自A/B/C
1 2 3 4 5 6 7 8 9 10 struct TestD : void foo1 () std::cout << "TestD.foo1\n" ; } };
此时虚表为如下:
1 2 3 4 5 6 7 8 9 10 11 12 13 14 15 16 17 18 19 20 21 22 23 24 25 26 27 28 29 30 31 32 33 34 35 Vtable for TestD TestD::_ZTV5TestD: 15 entries 0 (int 0 8 (int 16 (int 24 (int 32 (int -32 40 (int 48 (int 56 (int 64 (int 72 (int -88 80 (int 88 (int 96 (int 104 (int 112 (int Class TestD size=144 align=8 base size=144 base align=8 TestD (0x0 x7efe8ac38d98) 0 vptr=((& TestD::_ZTV5TestD) + 16 ) TestA (0x0 x7efe8acbe840) 0 primary-for TestD (0x0 x7efe8ac38d98) TestB (0x0 x7efe8acd5750) 32 vptr=((& TestD::_ZTV5TestD) + 48 ) TestA (0x0 x7efe8acbe8a0) 32 primary-for TestB (0x0 x7efe8acd5750) TestC (0x0 x7efe8acd57b8) 88 vptr=((& TestD::_ZTV5TestD) + 88 ) TestB (0x0 x7efe8acd5820) 88 primary-for TestC (0x0 x7efe8acd57b8) TestA (0x0 x7efe8acbe900) 88 primary-for TestB (0x0 x7efe8acd5820)
TestD 交叉继承造成结构的大小升级到了 144 ,导致 A冗余了2份,B 冗余了1份 ,是不是发现问题了,这么继承的话遇到重复继承基类导致内存会成倍的增加,怎么解决呢,下文会介绍到! 多继承会为每个基类分配一个 vptr 指针!vptr(TestD) 偏移量 0 vptr(TestB) 偏移量 32 vptr(TestC) 偏移量 88 多继承当涉及到类型转换的时候(向上/向下)类型转换的时候会涉及到指针的移动(下文会降到),具体的移动偏移量可以参考上面的class dump,向下转型需要使用 dynamic_cast ! 但是上面的例子多类型转换的时候会存在二义性,例如D向上换成A,会发现A内存中有3份到低是哪个,所以编译器不会让你转换,但是我们可以通过内存进行非安全转换!! 可以结合下面这个代码看下 1 2 3 4 5 6 7 8 9 10 11 12 13 14 15 16 17 18 19 20 21 22 23 24 25 26 27 28 29 30 typedef void (*VoidFunc) () VoidFunc GetVoidFunc (void *ptr, int offset) { long *pptr = (long *)ptr; long *table = (long *)(*pptr); long *func = table + offset; return (VoidFunc)(*func); } int main () TestD d; GetVoidFunc (&d, 0 )(); GetVoidFunc (&d, 1 )(); GetVoidFunc (((long *)&d) + 4 , 0 )(); GetVoidFunc (((long *)&d) + 4 , 1 )(); GetVoidFunc (((long *)&d) + 4 , 2 )(); GetVoidFunc (((long *)&d) + 11 , 0 )(); GetVoidFunc (((long *)&d) + 11 , 1 )(); GetVoidFunc (((long *)&d) + 11 , 2 )(); GetVoidFunc (((long *)&d) + 11 , 3 )(); }
虚继承 代码示例: https://godbolt.org/z/rxeza5EEa 或者 https://coliru.stacked-crooked.com/a/44776e393808d238
1 2 3 4 5 6 7 8 9 10 11 12 13 14 15 16 17 18 19 20 21 22 23 24 25 26 27 28 29 30 31 32 33 34 35 36 37 38 39 40 41 42 43 44 45 46 47 48 49 50 51 52 53 54 55 56 57 58 59 60 61 62 63 64 65 66 67 68 69 70 71 72 73 74 75 76 77 78 79 80 81 82 83 84 85 86 87 88 89 90 91 92 93 94 95 96 97 98 99 100 101 #include <iostream> struct TestA { virtual void foo1 () std::cout << "TestA.foo1\n" ; } virtual void foo2 () std::cout << "TestA.foo2\n" ; } void foo3 () std::cout << "TestA.foo3\n" ; } long arr[3 ]; }; struct TestB :virtual TestA { virtual void foo1 () std::cout << "TestB.foo1\n" ; } void foo2 () std::cout << "TestB.foo2\n" ; } virtual void foo3 () std::cout << "TestB.foo3\n" ; } long arr[3 ]; }; struct TestC :virtual TestB { virtual void foo4 () std::cout << "TestC.foo4\n" ; } }; struct TestD :virtual TestB { virtual void foo4 () std::cout << "TestC.foo4\n" ; } }; struct TestE :virtual TestC, virtual TestD { void foo1 () std::cout << "TestD.foo1\n" ; } }; typedef void (*VoidFunc) () VoidFunc GetVoidFunc (void *ptr, int offset) { long *pptr = (long *)ptr; long *table = (long *)(*pptr); long *func = table + offset; return (VoidFunc)(*func); } VoidFunc GetVoidFunc (void *ptr, int size, int offset) { long *pptr = ((long *)ptr) + size; long *table = (long *)(*pptr); long *func = table + offset; return (VoidFunc)(*func); } int main () TestC *c = new TestC (); GetVoidFunc (c, 0 , 0 )(); GetVoidFunc (c, 1 , 0 )(); GetVoidFunc (c, 1 , 1 )(); GetVoidFunc (c, 1 , 2 )(); GetVoidFunc (c, 5 , 0 )(); GetVoidFunc (c, 5 , 1 )(); TestB *b = c; std::cout << ((long )b - (long )c) << std::endl; TestA *a = c; std::cout << ((long )a - (long )c) << std::endl; TestE *d = new TestE (); GetVoidFunc (d, 9 , 0 )(); std::cout << "size: " << sizeof "\n" ; std::cout << "size: " << sizeof "\n" ; std::cout << "size: " << sizeof "\n" ; std::cout << "size: " << sizeof "\n" ; std::cout << "size: " << sizeof "\n" ; }
虚继承后内存仅需 72,只需要维护基类的vptr 和 基类分配的内存即可,所以虚继承可以极大的降低内存开销 ! 虚继承后内存中有且仅有一份基类的内存(包含多层引用),具体的内存逻辑图可以通过 dump class查看 多继承当进行强制类型转换时会通过移动指针实现,具体可以看下面例子,但是其实还有一些case,比如TestE中 TestE会和TestC的地址一样,原因很简单就是两者在virtual table中函数申明都一样,所以没必要再分配一份内存了(这个属于GCC的优化吧)! 1 2 3 4 5 6 7 8 9 10 11 12 int main () TestE *ee = new TestE (); TestC *cc = ee; TestD *dd = ee; TestB *bb = ee; TestA *aa = ee; std::cout << std::hex << ee << "\n" ; std::cout << std::hex << cc << "\n" ; std::cout << std::hex << bb << "\n" ; std::cout << std::hex << aa << "\n" ; std::cout << std::hex << dd << "\n" ; }
虚继承表如下图所示, 这里以 TestC 为例子 1 2 3 4 5 6 7 8 9 10 11 12 13 14 15 16 17 18 19 20 21 22 23 24 25 26 27 28 29 30 31 32 33 34 35 36 37 38 39 40 41 42 43 44 45 46 47 48 49 50 51 52 53 54 55 56 57 58 59 60 61 62 63 64 65 66 67 68 69 70 71 72 73 74 75 76 77 78 79 80 81 82 83 84 85 86 87 88 89 90 91 92 93 94 95 96 97 98 99 100 101 102 103 # TestB Vtable for TestB TestB::_ZTV5TestB: 12 entries 0 32 8 (int (*)(...))0 16 (int (*)(...))(& _ZTI5TestB) 24 (int (*)(...))TestB::foo1 32 (int (*)(...))TestB::foo2 40 (int (*)(...))TestB::foo3 48 18446744073709551584 56 18446744073709551584 64 (int (*)(...))-32 72 (int (*)(...))(& _ZTI5TestB) 80 (int (*)(...))TestB::_ZTv0_n24_N5TestB4foo1Ev 88 (int (*)(...))TestB::_ZTv0_n32_N5TestB4foo2Ev VTT for TestB TestB::_ZTT5TestB: 2 entries 0 ((& TestB::_ZTV5TestB) + 24) 8 ((& TestB::_ZTV5TestB) + 80) Class TestB size=64 align=8 base size=32 base align=8 TestB (0x0x7f779a7cc618) 0 vptridx=0 vptr=((& TestB::_ZTV5TestB) + 24) TestA (0x0x7f779a7b5660) 32 virtual vptridx=8 vbaseoffset=-24 vptr=((& TestB::_ZTV5TestB) + 80) # Vtable for TestC TestC::_ZTV5TestC: 20 entries 0 40 8 8 16 (int (*)(...))0 24 (int (*)(...))(& _ZTI5TestC) 32 (int (*)(...))TestC::foo4 40 0 48 0 56 0 64 32 72 (int (*)(...))-8 80 (int (*)(...))(& _ZTI5TestC) 88 (int (*)(...))TestB::foo1 96 (int (*)(...))TestB::foo2 104 (int (*)(...))TestB::foo3 112 18446744073709551584 120 18446744073709551584 128 (int (*)(...))-40 136 (int (*)(...))(& _ZTI5TestC) 144 (int (*)(...))TestB::_ZTv0_n24_N5TestB4foo1Ev 152 (int (*)(...))TestB::_ZTv0_n32_N5TestB4foo2Ev Construction vtable for TestB in TestC TestC::_ZTC5TestC8_5TestB: 12 entries 0 32 8 (int (*)(...))0 16 (int (*)(...))(& _ZTI5TestB) 24 (int (*)(...))TestB::foo1 32 (int (*)(...))TestB::foo2 40 (int (*)(...))TestB::foo3 48 18446744073709551584 56 18446744073709551584 64 (int (*)(...))-32 72 (int (*)(...))(& _ZTI5TestB) 80 (int (*)(...))TestB::_ZTv0_n24_N5TestB4foo1Ev 88 (int (*)(...))TestB::_ZTv0_n32_N5TestB4foo2Ev VTT for TestC TestC::_ZTT5TestC: 5 entries 0 ((& TestC::_ZTV5TestC) + 32) 8 ((& TestC::_ZTV5TestC) + 88) 16 ((& TestC::_ZTV5TestC) + 144) 24 ((& TestC::_ZTC5TestC8_5TestB) + 24) 32 ((& TestC::_ZTC5TestC8_5TestB) + 80) Class TestC size=72 align=8 // vptr(TestC) + vptr(TestB) + b.arr + vptr(TestA) + a.arr base size=8 base align=8 TestC (0x0x7f779a7cc750) 0 nearly-empty ## offset=0 (TestC vptr) -> 32 vptridx=0 vptr=((& TestC::_ZTV5TestC) + 32) TestB (0x0x7f779a7cc7b8) 8 virtual ## offset=8 (TestB vptr) -> 88 subvttidx=24 vptridx=8 vbaseoffset=-24 vptr=((& TestC::_ZTV5TestC) + 88) TestA (0x0x7f779a7b57e0) 40 virtual ## offset=40 (TestA vptr) -> 144 vptridx=16 vbaseoffset=-32 vptr=((& TestC::_ZTV5TestC) + 144) # TestE Class TestE size=80 align=8 # 80 = vptr(TestE/TestC) + vptr(TestB) + 24 + vptr(TestA) + 24 + vptr(TestD) base size=8 base align=8 TestE (0x0x7f9b2d91d1c0) 0 nearly-empty vptridx=0 vptr=((& TestE::_ZTV5TestE) + 56) TestC (0x0x7f9b2d91c9c0) 0 nearly-empty virtual primary-for TestE (0x0x7f9b2d91d1c0) subvttidx=40 vptridx=8 vbaseoffset=-48 TestB (0x0x7f9b2d91ca28) 8 virtual subvttidx=64 vptridx=16 vbaseoffset=-24 vptr=((& TestE::_ZTV5TestE) + 120) TestA (0x0x7f9b2d905960) 40 virtual vptridx=24 vbaseoffset=-32 vptr=((& TestE::_ZTV5TestE) + 176) TestD (0x0x7f9b2d91ca90) 72 nearly-empty virtual subvttidx=80 vptridx=32 vbaseoffset=-56 vptr=((& TestE::_ZTV5TestE) + 232) TestB (0x0x7f9b2d91ca28) alternative-path
析构函数 上面聊到了继承,但是没有聊到内存回收,我们知道不论是虚继承、普通继承他的内存分配机制大家上面应该是有所了解了,但是对于内存回收没谈到,C++作为一个非GC语言需要手动回收。析构函数使用虚函数完美的解决了内存回收,那么具体怎么使用呢?
注意:抽象类一定要为把析构函数定义为虚函数,否则系统不会回收!
1 2 3 4 5 6 7 8 9 10 11 12 13 14 15 16 17 18 19 20 21 22 23 24 25 26 27 28 29 30 31 32 33 34 35 36 37 38 39 40 41 42 43 44 #include <iostream> #include <memory> struct TestA { virtual ~TestA () { std::cout << "~TestA()\n" ; } }; struct TestB :virtual TestA { ~TestB () override { std::cout << "~TestB()\n" ; } }; struct TestC :virtual TestA { ~TestC () override { std::cout << "~TestC()\n" ; } }; struct TestD :virtual TestB, virtual TestC { ~TestD () override { std::cout << "~TestD()\n" ; } }; int main () TestA *a = new TestD (); delete a; TestD *td = new TestD (); delete td; std::shared_ptr<TestA> share_a = std::make_shared<TestD>(); }
还有一个case大家有兴趣可以看下,就是多继承类型转换会涉及到指针移动,因此如果没有虚继承很可能会出现 pointer being freed was not allocated: https://zhuanlan.zhihu.com/p/26392392 。 我相信通过本文的学习对于这个问题应该大家也能知道为啥会报错!
或者还有一种就是把构造(包含析构)函数设置为protected防止向上转型后调用析构函数,这么的话由派生类去析构就不会出现问题,代码例子: https://godbolt.org/z/d15KdT3PM 。
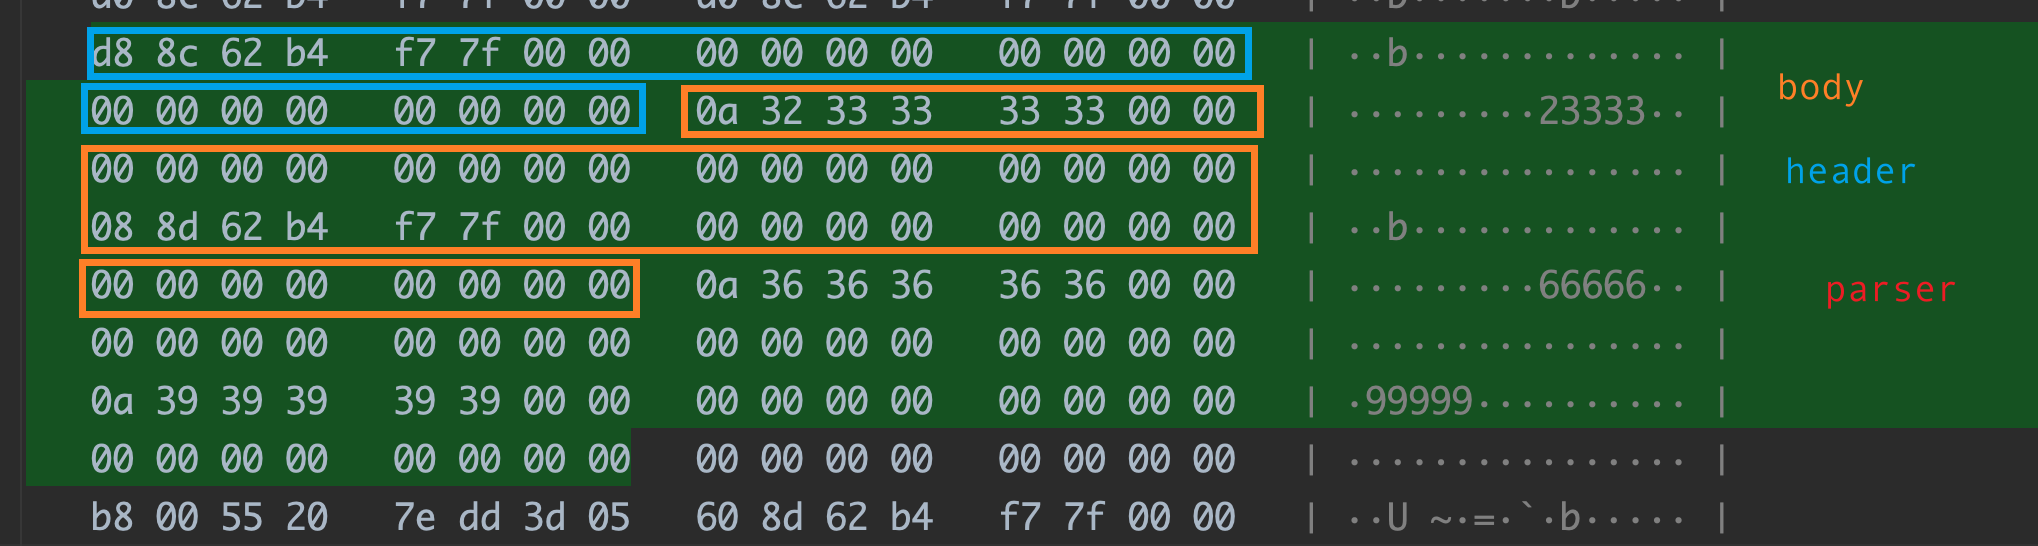
坑 类型转换 和 void指针的坑 我在使用http_parser库封装http库的时候发现,http_parser库是c语言写的,对接C++的话暴露了一堆void指针,就导致很容易写出BUG代码!下面是我写了一个demo,为了复用我抽出了 headers_parser 、body_parser ,导致需要void指针向上转型
1 2 3 4 5 6 7 8 9 10 11 12 13 14 15 16 17 18 19 20 21 22 23 24 25 26 27 28 29 30 31 32 #include <iostream> #include <map> using headers_t = std::map<std::string, std::string>;struct headers_parser { static void on_header (void * ptr, const std::string& key, const std::string& value) auto parser = static_cast <headers_parser*>(ptr); parser->headers_[key] = value; } headers_t headers_{}; }; struct body_parser { static void on_data (void * ptr, const std::string& data) auto parser = static_cast <body_parser*>(ptr); parser->body_ = data; } std::string body_{}; headers_t extendion_headers_{}; }; struct response_parser : std::string status_{}; std::string version_{}; }; int main () response_parser parser{}; response_parser::on_data (&parser, "data" ); response_parser::on_header (&parser, "k1" , "v1" ); }
运行一下???我去内存访问异常了,出现了段错误!
1 Process finished with exit code 139 (interrupted by signal 11 :SIGSEGV)
怎么定位呢?估计是类型转换的问题,我debug调试了下发现 static_cast 在转换void指针的时候是非常的暴力!!就是内存填充一下就行了!你可以看一下下面这个例子!
1 2 3 4 5 6 7 8 9 10 11 int main () response_parser parser{}; std::cout << &parser << "\n" ; void * ptr = &parser; auto header = static_cast <headers_parser*>(ptr); std::cout << header << "\n" ; auto body = static_cast <body_parser*>(ptr); std::cout << body << "\n" ; }
内存结果就是如图所示!
但是实际上内存是啥了?
所以那里出问题了呢?问题就是 void* 导致编译器丢失了原类型,导致向上转型失败了!
那么很多时候我们和一些 c 语言的库进行打交道的时候,确实存在一堆 void* 指针,这时候如果我们直接 static_cast 转换的话会直接出BUG!怎么解决这个问题?
如果不涉及到 void* 指针, 下面代码没问题 1 2 3 4 5 6 7 8 9 10 int main () response_parser parser{}; auto header = static_cast <headers_parser*>(&parser); std::cout << header << "\n" ; auto body = static_cast <body_parser*>(&parser); std::cout << body << "\n" ; }
如果涉及到void 指针,只能将 void* 强制转换为 response_parser 然后再用类型转换! 1 2 3 4 5 6 7 8 9 int main () response_parser parser{}; void * ptr = &parser; auto header = static_cast <headers_parser*>(static_cast <response_parser*>(ptr)); std::cout << header << "\n" ; auto body = static_cast <body_parser*>(static_cast <response_parser*>(ptr)); std::cout << body << "\n" ; }
那么怎么解决我们的问题?是的只能用C++模版了,最终完美解决!
1 2 3 4 5 6 7 8 9 10 11 12 13 14 15 16 17 18 19 20 21 22 23 24 25 26 27 28 29 30 31 32 33 34 #include <iostream> #include <map> using headers_t = std::map<std::string, std::string>;template <typename T>struct headers_parser { static void on_header (void * ptr, const std::string& key, const std::string& value) auto parser = static_cast <headers_parser*>(static_cast <T*>(ptr)); parser->headers_[key] = value; } headers_t headers_{}; }; template <typename T>struct body_parser { static void on_data (void * ptr, const std::string& data) auto parser = static_cast <body_parser*>(static_cast <T*>(ptr)); parser->body_ = data; } std::string body_{}; headers_t extendion_headers_{}; }; struct response_parser : std::string status_{}; std::string version_{}; }; int main () response_parser parser{}; response_parser::on_data (&parser,"data" ); response_parser::on_header (&parser,"k1" ,"v1" ); }
怎么评价 staic_cast 和 dynamic_cast 呢,在不清楚上下文的情况下用 dynamic_cast,否者用 staic_cast ,后者性能高!
1 2 3 4 5 6 7 8 9 10 11 12 13 14 15 16 17 18 19 20 21 22 23 24 25 26 27 28 29 30 31 32 33 34 35 36 37 #include "spdlog/spdlog.h" #include "gtest/gtest.h" struct reader { reader () = default ; virtual ~reader () = default ; virtual size_t read_some (char * buffer, size_t buffer_size) return 0 ; }; }; struct buffer_reader final : explicit buffer_reader (std::string& buffer) : buffer_(buffer) { } size_t read_some (char * buffer, size_t buffer_size) override return buffer_size; } private : std::string& buffer_; }; void test (reader& r) SPDLOG_INFO (r.read_some (nullptr , 100 )); } TEST (Struct, oo) { std::string buffer = "hello world" ; reader r = buffer_reader (buffer); SPDLOG_INFO (r.read_some (nullptr , 10 )); buffer_reader br = buffer_reader (buffer); test (br); }
这个其实很坑的,大家注意奥!
总结 只要基类定义了虚函数,就会添加到基类的虚函数表中,子类重写后是否标记为虚函数(virtual修饰)都会添加到子类的虚函数表中 虚继承,可以降低内存开销,在一些交叉继承中有效果 子类继承的时候最好用 override 修饰一下函数重写,方便代码阅读 子类不涉及到重写,没必要设置一个虚函数,因为会额外分配内存 抽象类一定要把析构函数设置为虚函数,否则会存在内存泄漏或者内存回收出现空引用问题 如果遇到特别不理解的,看一下 dump class 看看或者查看下mem 虚表的设计或多或少有些冗余,因为在派生类中记录下来全部的虚函数的函数地址(是否重写都会记录),这个过程在编译期就决定了,可以通过查看汇编代码发现数据段中定义有virtual table. 多阅读源码、优秀的开源项目可以掌握不少技巧,多记录多尝试 其他小点 我们可以使用 traits 的 std::is_convertiblestd::enable_shared_from_this 1 2 3 4 5 6 7 8 9 10 11 12 13 14 15 16 17 18 19 20 21 22 23 24 25 26 27 #include <iostream> #include <type_traits> struct TestB {struct TestC :private TestB {};struct TestD :template <typename T>typename std::enable_if<std::is_convertible_v<T, TestB *>>::type DoPrint (T t) { std::cout << "impl TestB*" << std::endl; } template <typename T>typename std::enable_if<std::is_convertible_v<T, TestB>>::type DoPrint (T t) { std::cout << "impl TestB" << std::endl; } void DoPrint (...) std::cout << "not impl TestB" << std::endl; } int main () DoPrint (new TestD ()); DoPrint (TestD{}); DoPrint (TestC{}); }
继承是可以限定作用域的,继承是无法使用基类private的成员的,除非基类给你开启friend,struct的话默认是public继承,class默认是private继承. protect继承会使用继承的public属性的成员变成protect,private会使用继承的成员变成(public&protect -> private)。 基类申明为final表示禁止继承,override可以显示申明重写!
继承构造函数 ,当我们想直接服用父类的构造函数需要手动再申明一次!!
1 2 3 4 5 6 7 8 9 10 11 12 13 14 15 16 17 18 19 20 21 22 23 24 25 26 27 28 29 30 31 #include <iostream> struct TestB { TestB (int f1, int f2) : f1_ (f1), f2_ (f2) { } virtual int sum () return f1_ + f2_; } private : int f1_; int f2_; }; struct TestC : using TestB::TestB; }; struct TestD : TestD (int f1, int f2) : TestB (f1, f2) { } }; int main () TestC c = TestC (1 , 2 ); std::cout << c.sum () << std::endl; TestD d = TestD (1 , 2 ); std::cout << c.sum () << std::endl; }
参考文章