分享一下个人博客搭建,本人是有一个个人的私有仓库,然后呢私有仓库内有些感觉写的可以文章会分享到自己的博客上,但是用Hexo+Next主题吧,发现哇使用起来比较麻烦,还需要copy来copy去的,所以自己写了一些脚本方便使用和操作!主要是为了傻瓜式的使用!同时帮助换个工作电脑可能就跑不起来了,所以写一篇文章记录下!同时本文也会分享一些Hexo的插件,比如支持流程图和UML,以及一些优化,比如使用gulp压缩代码!
1. 环境
- 环境: Linux or Mac (后期会增加Windows环境,主要是不会写windows的脚本!)
- 创建一个账号:GitHub 个人账号,例如我的个人账号是
Anthony-Dong - 创建一个仓库:GitHub仓库,例如我的仓库名是
anthony-dong.github.io,格式就是{个人账号名称}.github.io,注意都要小写,仓库地址 https://github.com/Anthony-Dong/anthony-dong.github.io - 下载我的博客模版到本地,项目地址: https://github.com/Anthony-Dong/blog_template
1 | wget https://github.com/Anthony-Dong/blog_template/archive/refs/heads/master.zip |
- 启动项目
- 配置参数( 如果你本地有docker且已经启动起来了,直接
make init run起来了,下面可以不看了!)
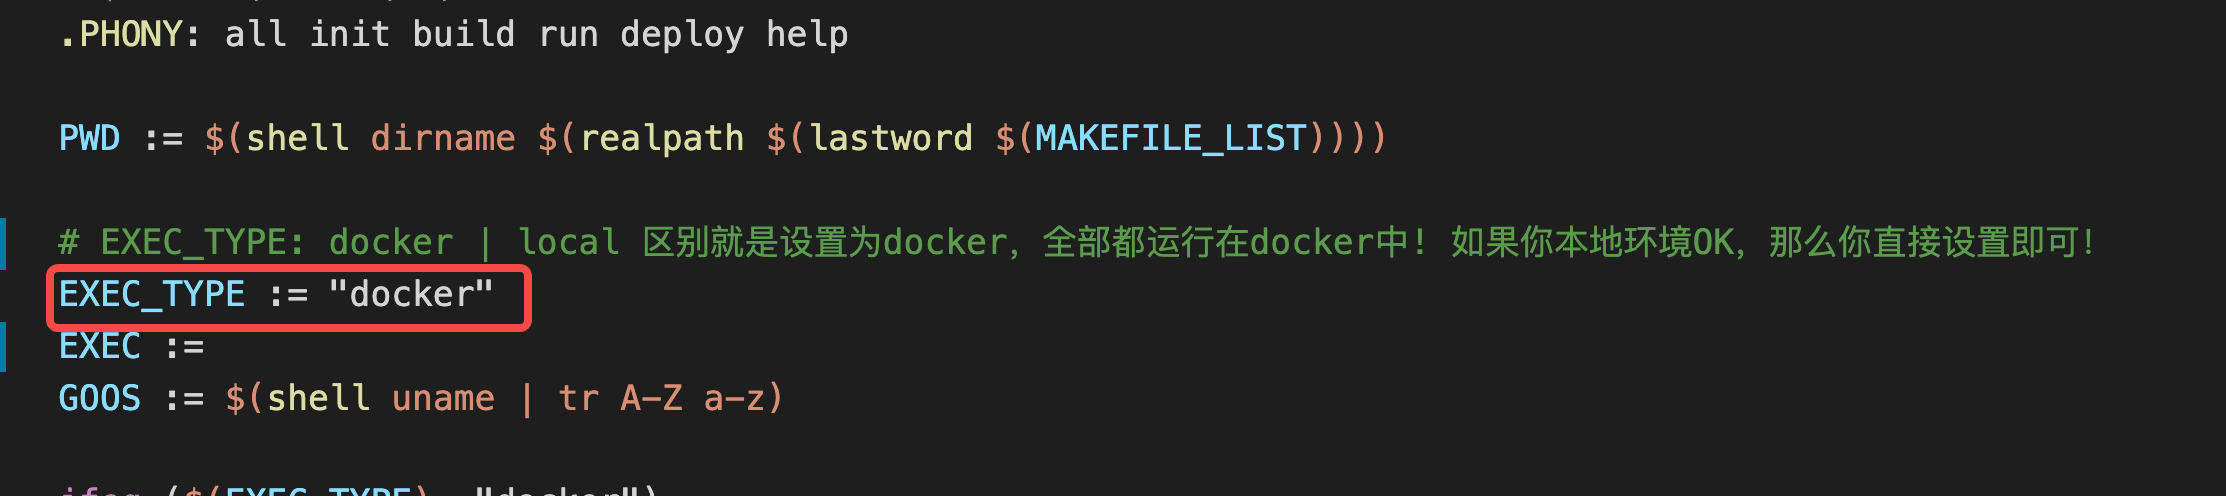
如果你的环境依赖本地都有,只需要把 EXEC_TYPE := docker 改成 EXEC_TYPE :=即可
注意: 如果你用环境依赖指的是 node+hexo环境,需要注意的是你需要安装 node.js 16.3 版本 + hexo 4.3.0 版本,可以参考下面的安装方式!
1 | 安装 node.js,如果你是mac环境完全可以下面这样安装 |
- 初始化环境: 执行
make init run即可! - 具体帮助命令
1 | ➜ note-master git:(master) ✗ make |
2. 快速修改配置
- 修改配置文件
hexo-home/_config.yml, 只需要修改我下面标注的!
1 | # Site |
- 修改配置文件
hexo-home/themes/next/_config.yml, 简单使用只需要替换以下的配置文件,高级使用请看官方文档: https://github.com/iissnan/hexo-theme-next
1 | # 下面的联系地址可以改成你的!你也可以根据配置文件添加 |
- 修改以下路径的图片,替换成你的图片
1 | hexo-home/themes/next/source/images/alipay.png 你的支付宝收款码 |
- 修改个人简介,可以修改此文件:
hexo-home/source/about/index.md即可! - 如果开启百度统计,只需要修改
hexo-home/themes/next/_config.yml此文件即可! appid是hm.src = "https://hm.baidu.com/hm.js?{app_id}";最后那个ID!
1 | # Baidu Analytics |
3. 添加评论插件
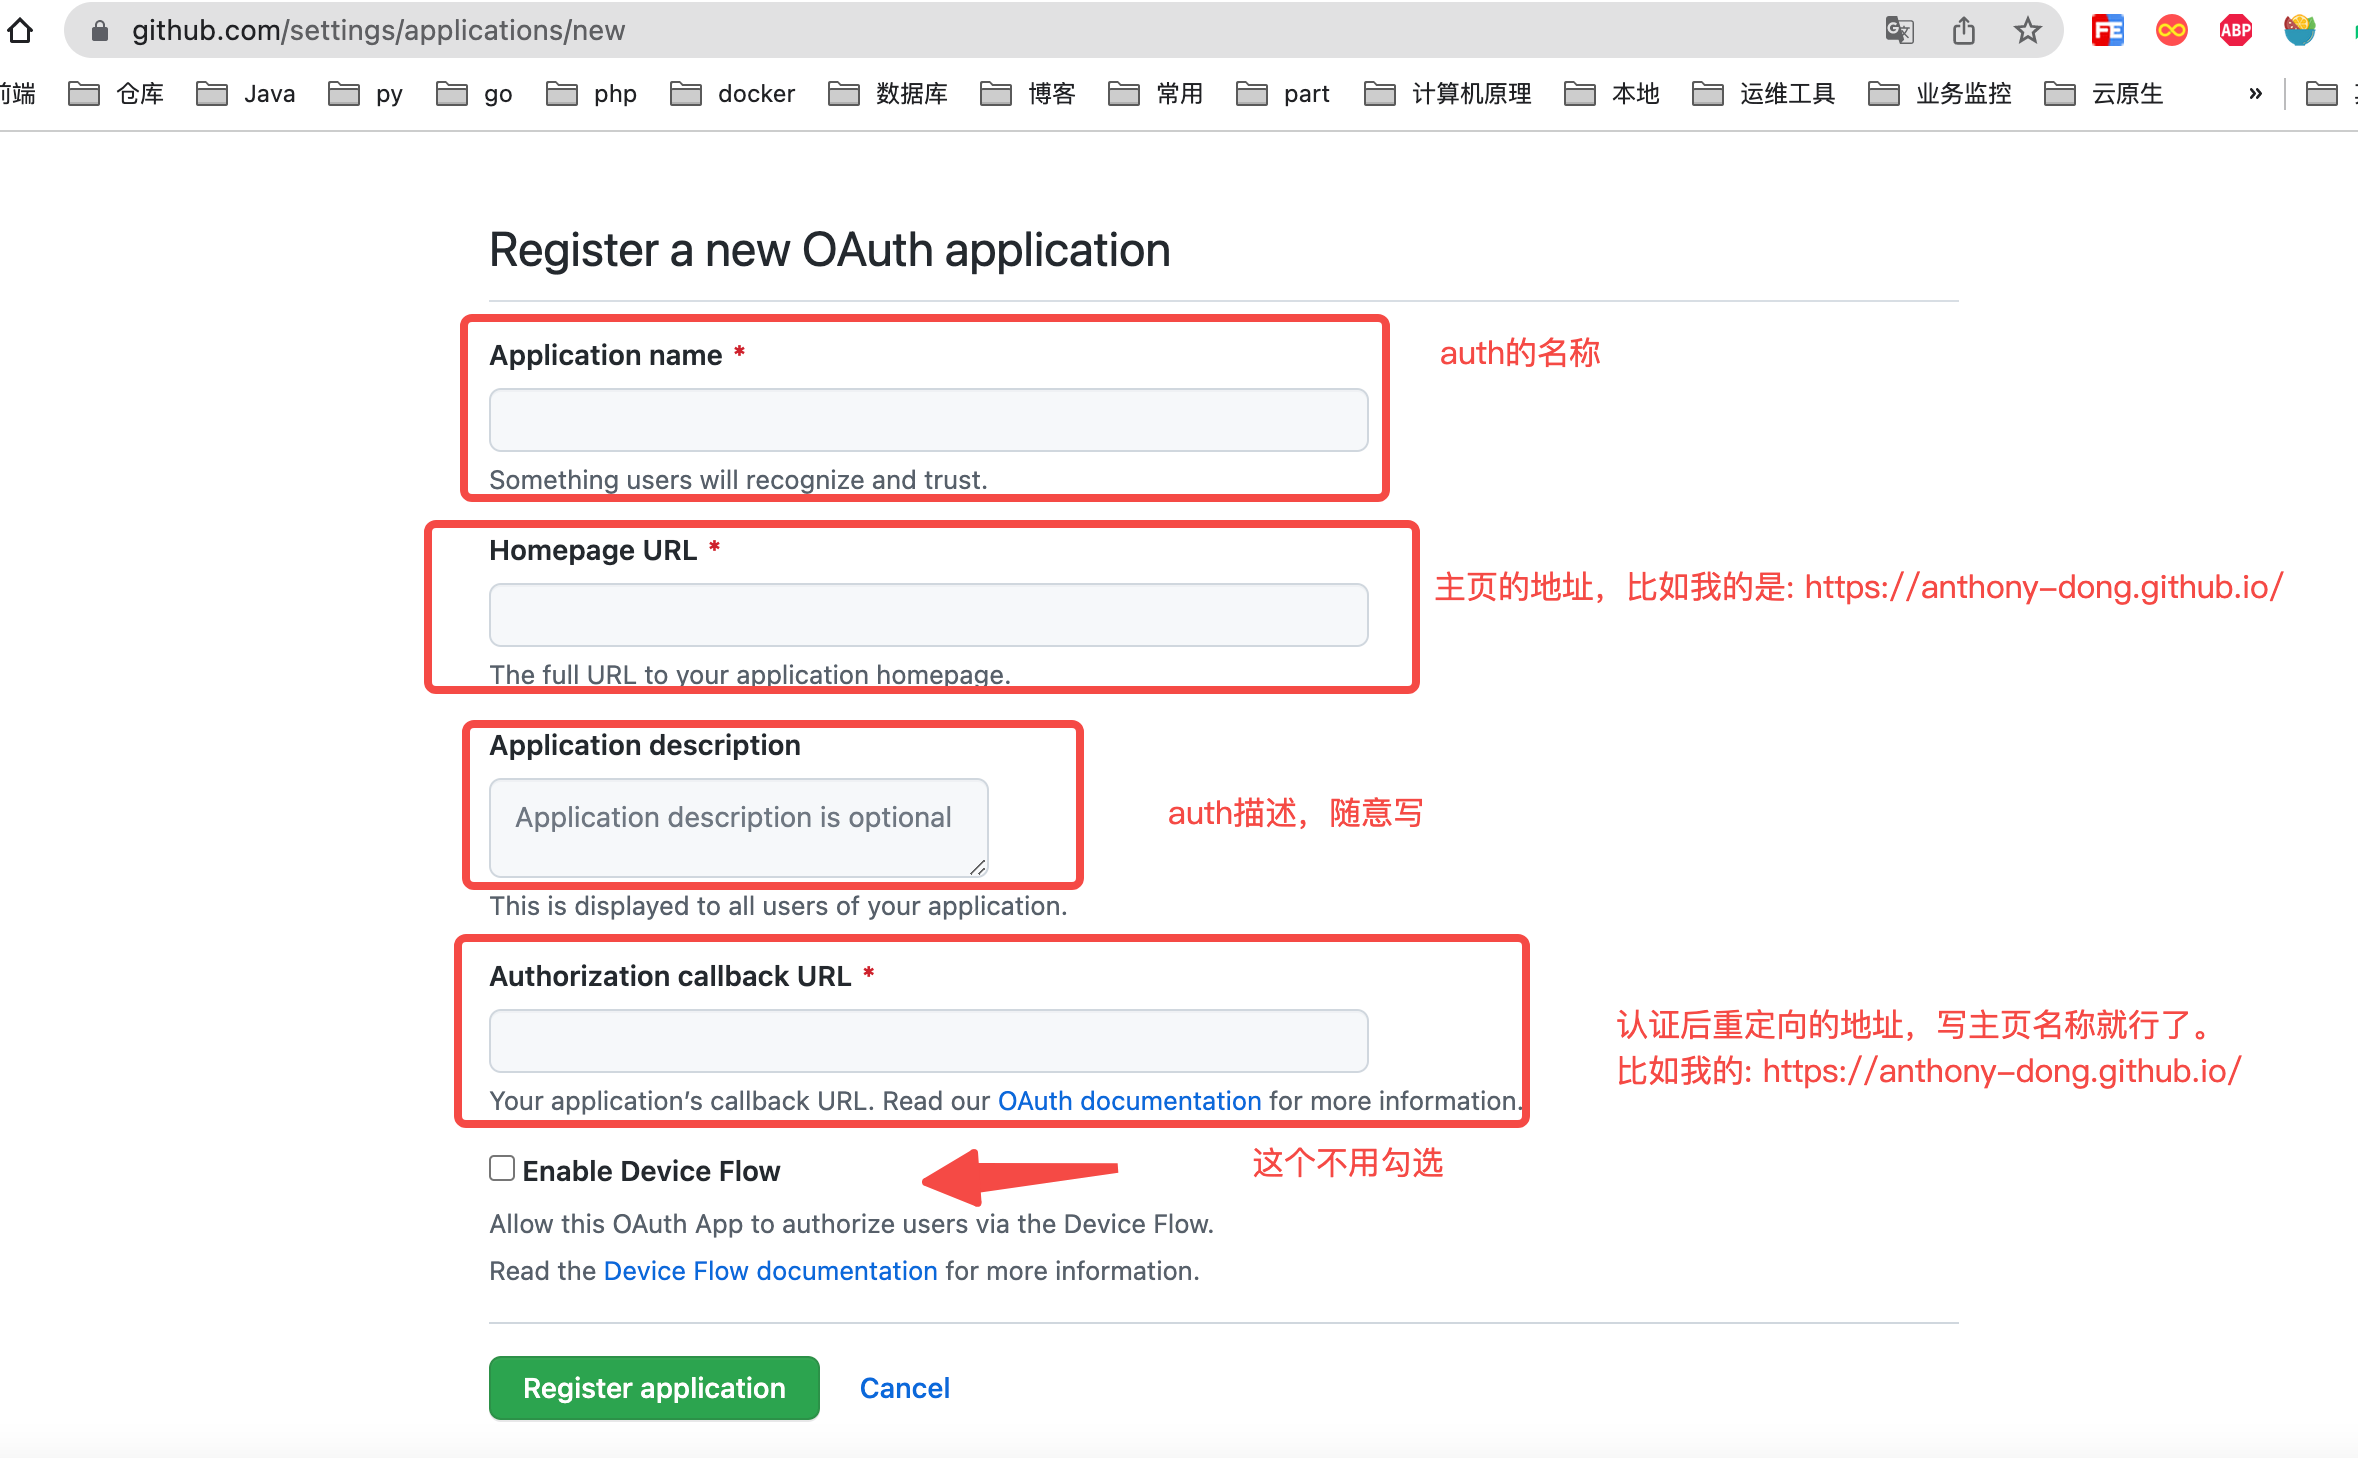
- 首先前往链接: Register a new OAuth application 创建一个
Auth APP, 申请页面如下,可以根据我的注释进行填写
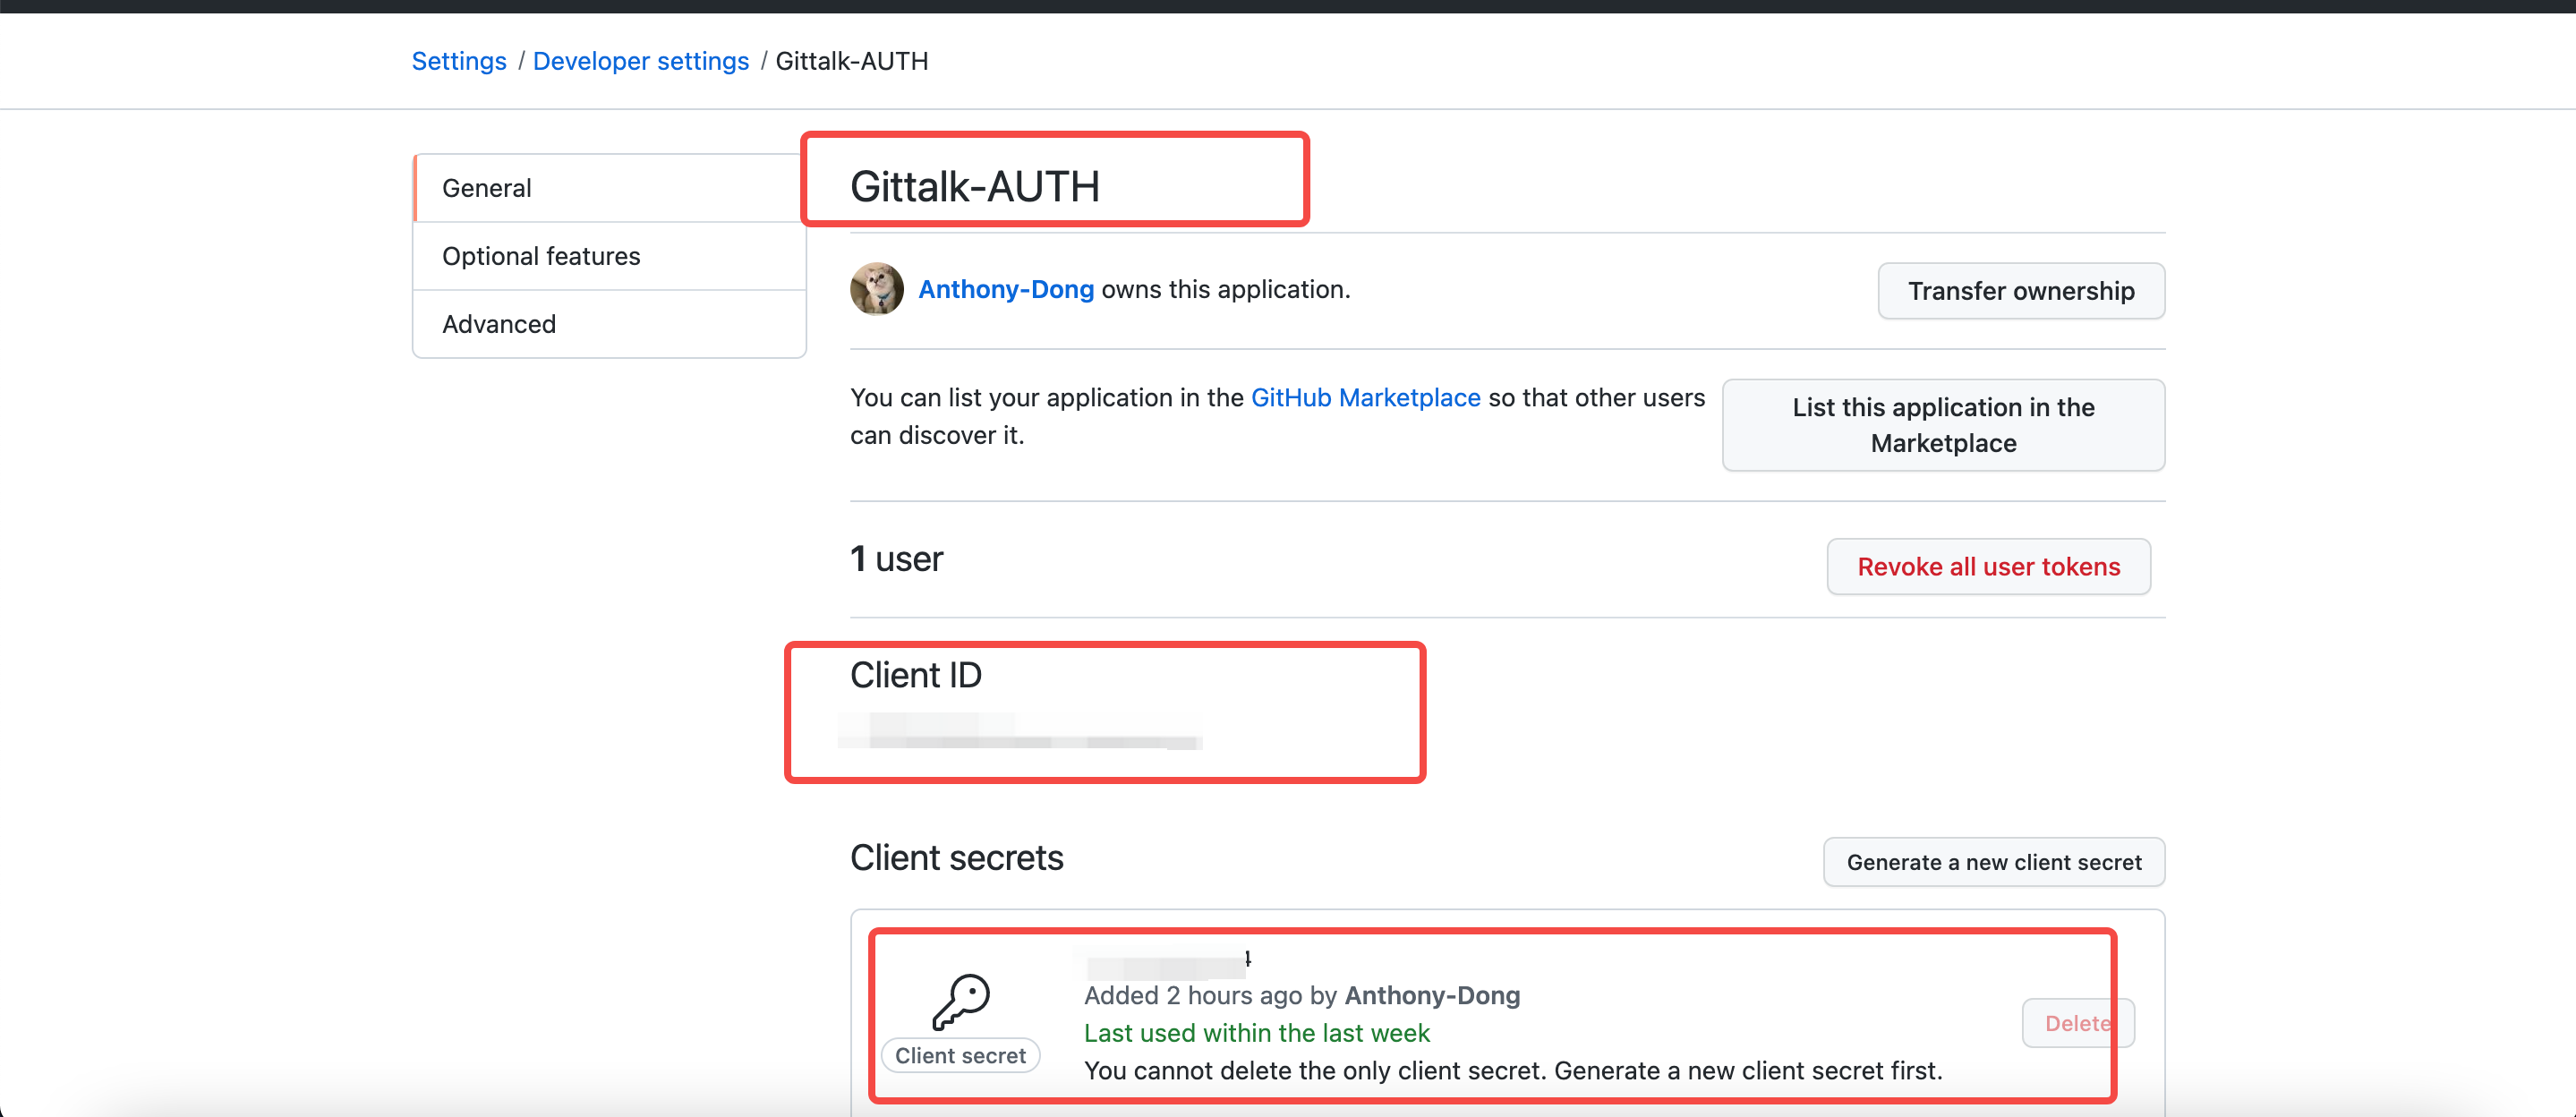
- 申请完成后可以在页面上查看
client-id和secret-id
- 然后修改
hexo-home/themes/next/_config.yml添加gitalk评论系统
1 | # Gitalk |
同时注意一下看一下是否存在hexo-home/themes/next/layout/_custom/sidebar.swig以下内容,不存在可以复制一下
1 | {% if page.comments and config.gitalk.enable %} |
- 搞完以后记得重新build下
make build下,然后make run 启动就行了 - 打开页面会遇到这种情况
Related Issues not found, 这时候你其实已经成功了,make deploy发布就行了!
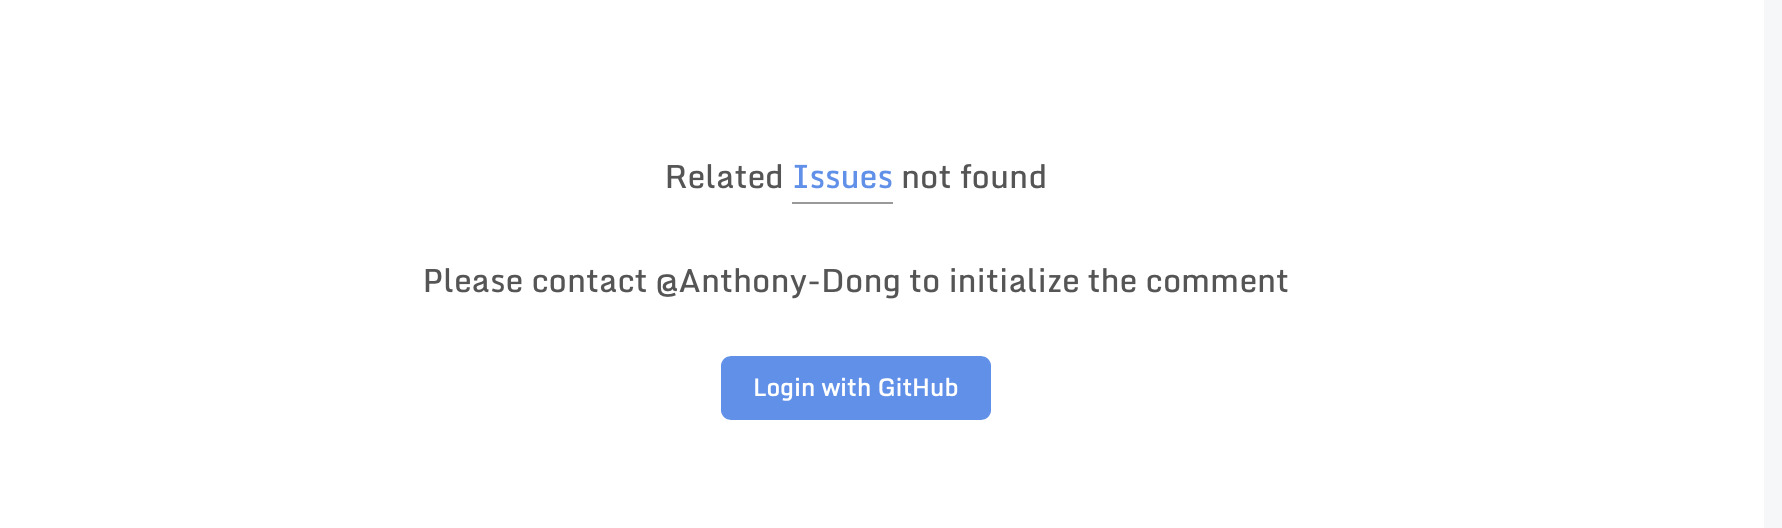
这时候需要你登陆你的GitHub账号,然后他就会自动帮你初始化issues!
注意:
- 你每发布一篇文章都需要你打开页面初始化下一
Issues! - 你本地
http://localhost:4000访问无法创建Issues的!
- 打开你的仓库的Issues页面就可以看到创建 issues 了!
4. 支持mermain(流程图)
- 在目录
hexo-home执行npm install hexo-filter-mermaid-diagrams --save, 我安装的是1.0.5^版本 - 修改配置文件
hexo-home/themes/next/_config.yml
1 | # Mermaid tag |
注意更多配置可以参考: mermaid-js 文档 , 需要配合一起修改 hexo-home/themes/next/layout/_third-party/tags/mermaid.swig 文件!
- 修改css样式,在文件
hexo-home/themes/next/source/css/_colors.styl末尾添加
1 | .mermaid { |
- 切记一定要关闭
pjax, 需要修改配置文件hexo-home/themes/next/_config.yml,原因是切换页面需要重新渲染流程图,如果开启切换页面的时候不会帮你渲染!!
1 | # Easily enable fast Ajax navigation on your website. |
5. 支持flowchart (流程图)
- 在目录
hexo-home执行npm install --save hexo-filter-flowchart,我安装的版本是1.0.4! - 修改配置文件
hexo-home/_config.yml, 默认的sdk版本过低,可能支持不太好,所以需要更换一下!
1 | # flowchart使用 hexo-filter-flowchart https://github.com/bubkoo/hexo-filter-flowchart |
- 具体更多配置可以参考文档: hexo-filter-flowchart
6. 压缩HTML、JS、CSS
目前hexo生成的代码,全部都是未压缩,目前前端主流的方式都是使用webpack和gulp进行压缩,但是webpack这块本人也未搜索到相关资料,所以用的gulp进行压缩!
- 安装
gulp,执行npm install --global gulp-cli - 安装其他插件
- gulp: 核心框架
- gulp-clean-css: 压缩css代码
- gulp-uglify: 压缩js代码,这个不支持es6
- **gulp-uglify-es**:压缩js代码,支持es6
- gulp-htmlclean:压缩html代码,清除空格和换行符
- gulp-htmlmin:压缩html的js/css代码等,但是支持度不是特别好,比如js代码无法压缩成行!
- gulp-html-minifier-terser: 压缩html的js/css代码,支持压缩js(兼容es6)
- 安装依赖
1 | npm install gulp gulp-clean-css gulp-uglify-es gulp-html-minifier-terser |
- 配置文件
1 | var gulp = require('gulp') |
- 参考文章
https://blog.inkuang.com/2021/405/
7. 其他BUG修复
1. 图片设置 style="zoom: 50%;" 导致图片放大展示失败
背景:目前typora其实可以缩放图片,导致使用 medium-zoom 可能出现bug,参考 issues#164 我大概改了一版本!
- 修改文件:
hexo-home/themes/next/source/js/next-boot.js
1 | // 修改此行代码 |
- 修改文件:
hexo-home/themes/next/source/js/utils.js, 添加mediumZoomFunc方法!
1 | mediumZoomFunc: function () { |
8. 配置 Tool 一起使用
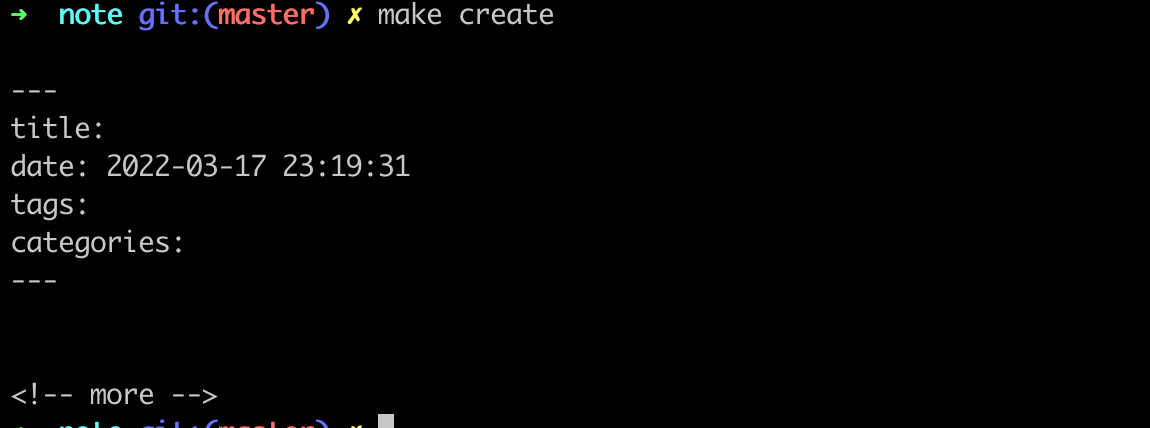
1. 创建一篇文章 or 标注一篇文章
- 执行下面命令
make create,会生成一个页眉,你只需要把这个东西 copy 到你的文章中去!
- 找到你的文章,写一些描述信息,例如我这篇文章就是这么写的!

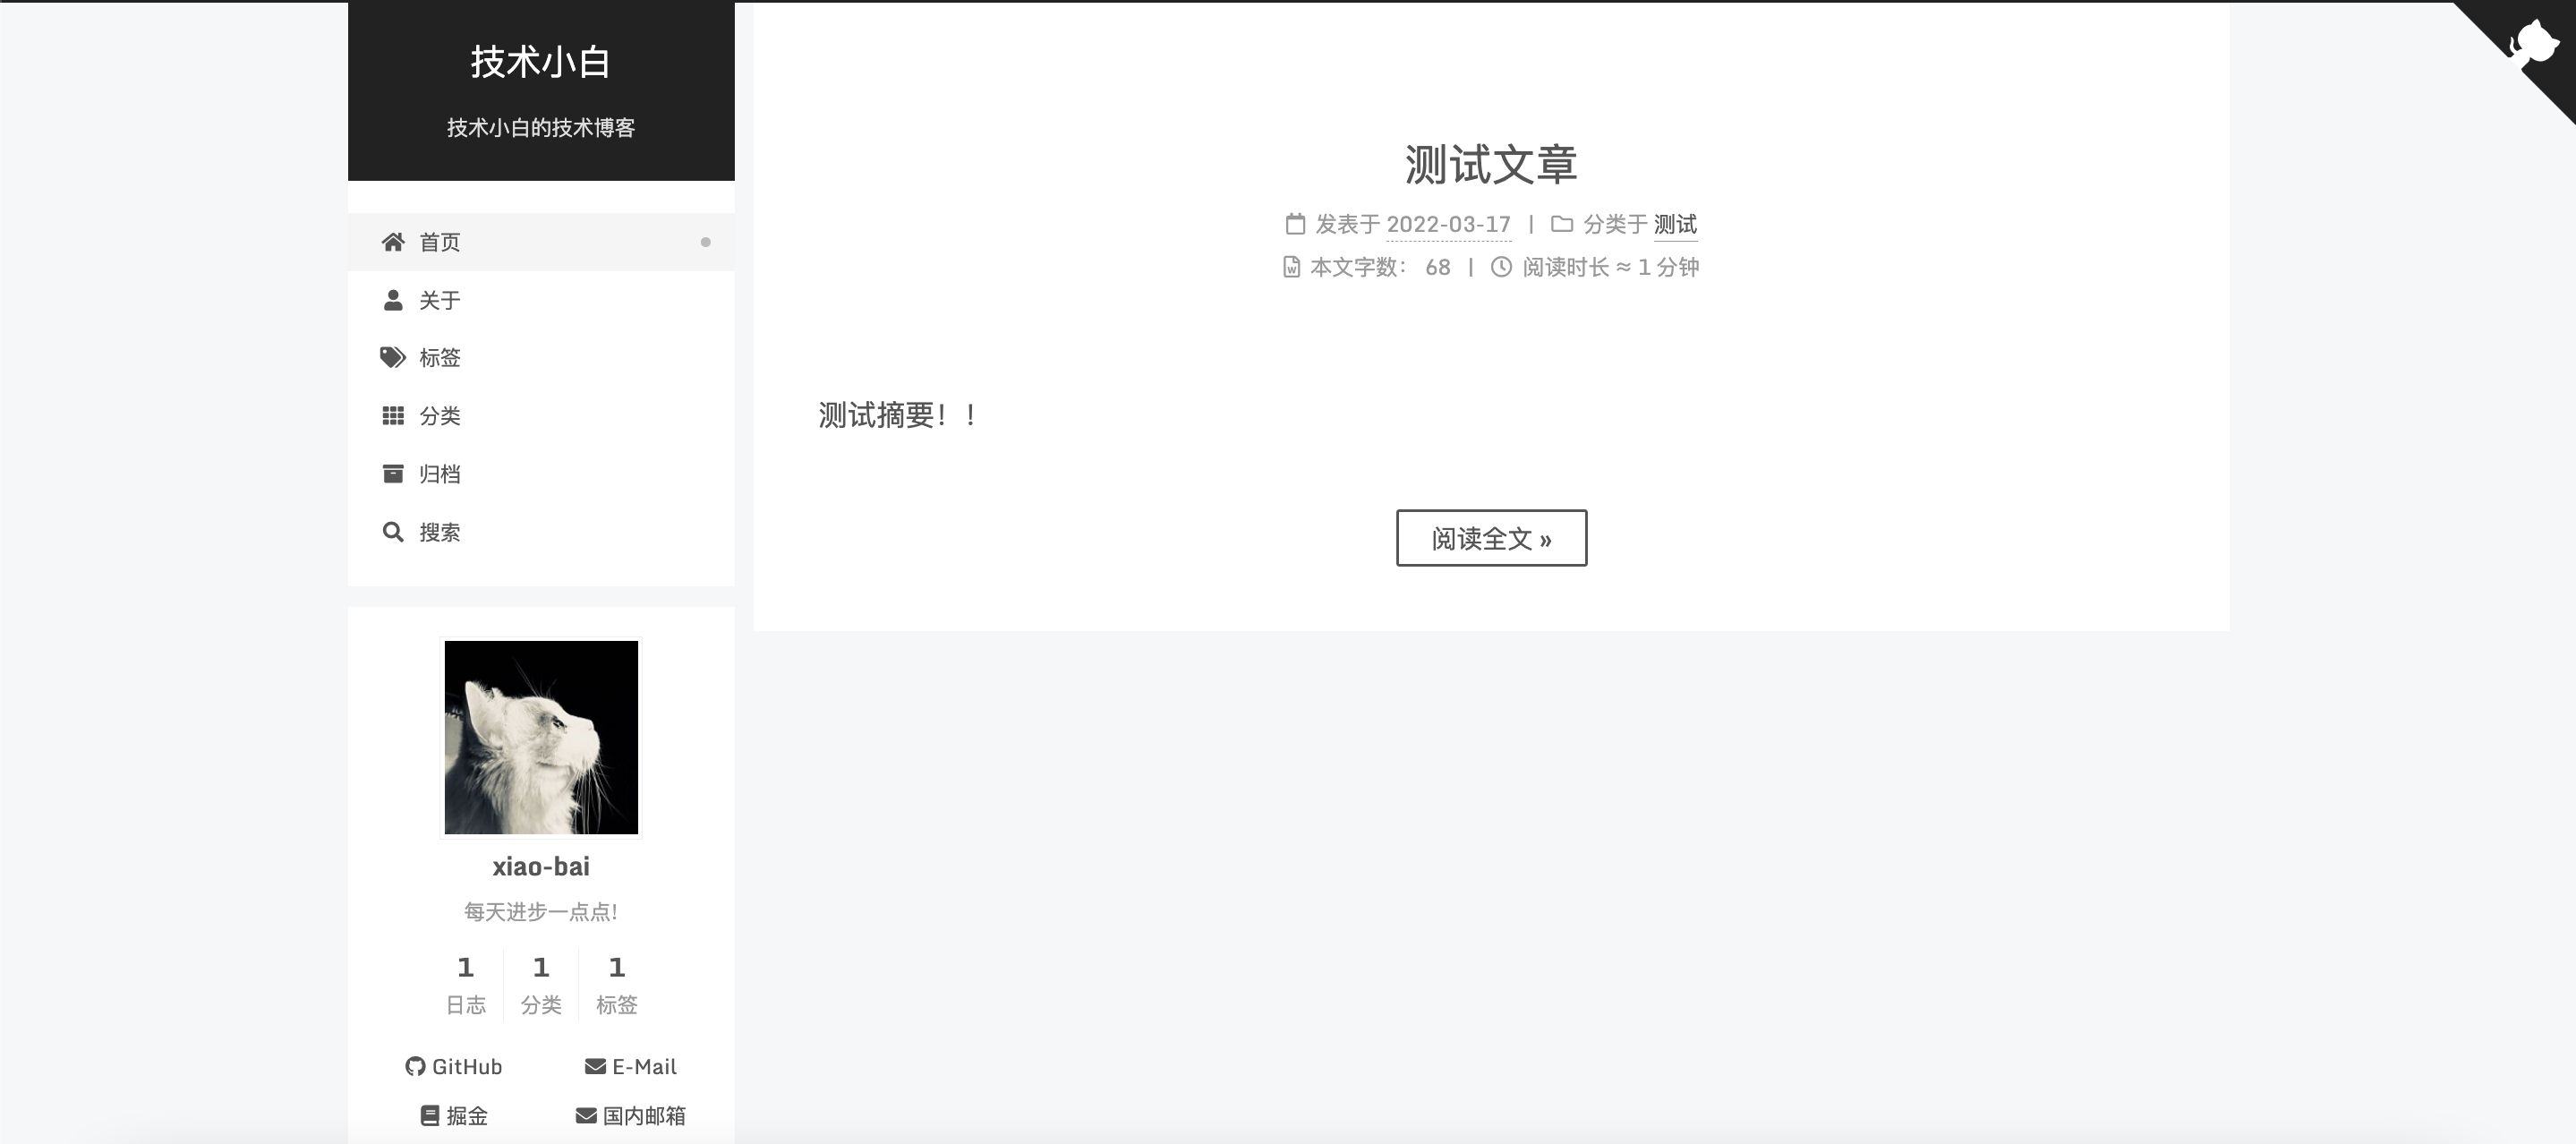
2. 发布到网站上
- 本地构建一下
make run,看看详情信息
1 | ➜ note-master git:(master) ✗ make run |
- 然后访问 http://localhost:4000 即可!看到网页
- 最后没问题,执行
make deploy即可发布到远程网站了!
1 | make deploy |
3. 高级功能
1. 敏感关键字过滤
这个我们都知道,公司会有安全团队扫描开源仓库,假如你涉及到公司敏感字眼也比较恶心,比如把你个人信息暴露了!但是要知道不能发布公司内部的文章上传出去,或者公司内部的代码,这个是任何公司的红线!切记,这个插件主要就是过滤一些公司的名字而已!
配置文件在: 你只需要列出敏感词即可!在KeyWord地方!
1 | Hexo: |
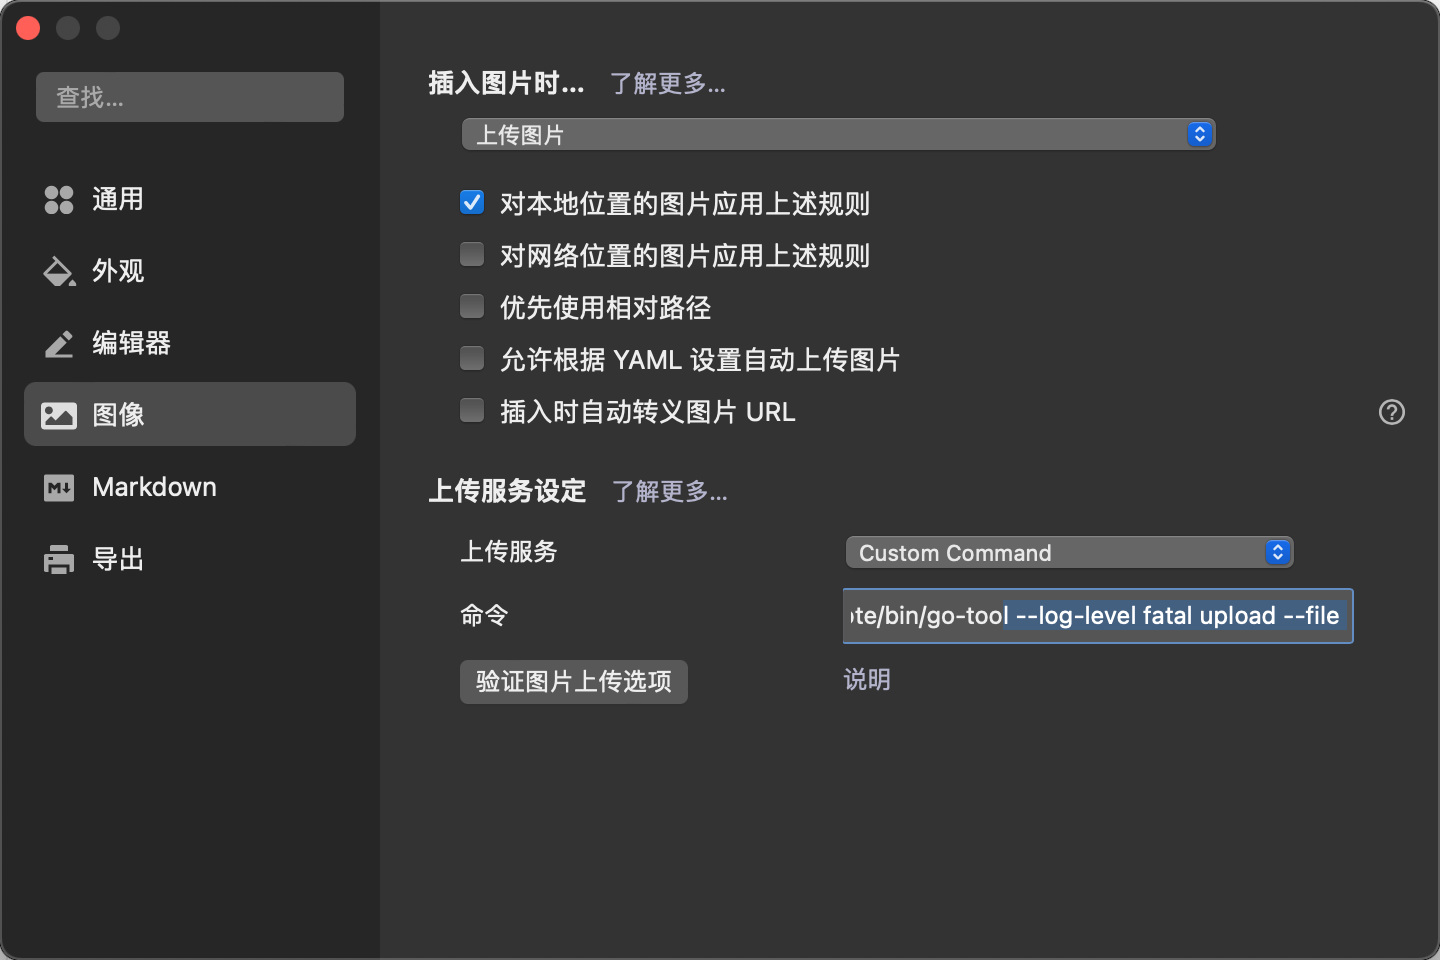
2. 图片上传
目前我使用的是我自己写的工具上传图片,主要是用的阿里云的OSS,基本上一年花个不到几块钱就可以搞定!
具体可以参考 Upload 插件
你在你本地的 .config/.go-tool.yaml 文件,配置一下配置即可!
1 | Upload: |
然后Typora配置下:
3. 修改个人主页
修改本地文件hexo-home/source/about/index.md 即可